Pages

Monday, 28 November 2011

Bling Baubles

Here we are at the start of another week, and another week closer to Christmas! Where is the time going??

Today's card is for the Less is More Challenge where the subject is


This is my card


First I inked up the flourish with Versamark and then I masked off the edges to make a round shape, before stamping onto a white card.


I  then heat embossed the shape with gold powder ( sorry but my photo is not the best to show the gold), and repeated the process twice more ( placing the stamp by using the Stamp-a-ma-jig ). The sentiment was stamped in red across the top, and gold wiggly lines drawn to hang the baubles, and the finishing touches were the "bling gems".

I was pleased with my efforts until I drew the lines to hang the baubles, and then I realised that the right hand one is a little too close to the top one, but I couldn't do anything to disguise it, so just went with it.


Recipe: Card = from my stash
Stamps = Bliss and Dovecraft
Inks = Versamark and Real Red
Tools = Heat Gun and Stamp-a-ma-jig
Extras = Gold embossing powder, Gold Pilot marker, and gems

Thanks for dropping by, and please call again if you can.


Sunday, 27 November 2011

Fresh Cut Thank You

I just love Sundays when there is a Grand Prix on the TV, as my family know that I love them so much they always try to leave me alone, so it means that I can craft while sat on the sofa!!

Yesterday I went with my family to see the 3D film "Arthur Christmas" at the cinema, and as my sister paid for me, I've made her a Thank You card.

I will also be entering it into 2 challenges;


The sketch is from the Clean and Simple Challenge ,

and the colour palette is from the Color Throwdown Challenge


This is my card


I stamped the flower and text stamp on white card in brown ink, cut it into a circle and sponged the edges.The flowers were then coloured with SU Write markers and placed on a brown scallop circle made with the BS. I then drew around a plate for the dome shape on some blue card and randomly stamped the flower in red and blue on it, and the leaf sprig in brown. I stamped the sentiment frame and text in brown on white card before matting it onto brown card. This frame and the floral disc were placed on 3D pads on a square white card that had had the blue card stuck at the bottom. The finishing touch was the red ribbon.

Recipe: 
Card = Bashful Blue, Chocolate Chip, Whisper White, and white card from my stash
Stamps = Fresh Cuts and Just Believe
Inks = Island Indigo, Real Red, and Chocolate Chip
Tools = Big Shot and Nestabilities
Extras = Ribbon and 3D pads


At the cinema we had to wear the sexy specs that make 3D what it is, absolutely brilliant! , but I dont think they'll make it onto the catwalks of London or Milan anytime soon!!.We were all amazed that Nathan and Sophie sat through the whole film without a peep, in fact Sophie went to sleep!!, but if you have kids I can highly recommend this film, there are even the odd one liners for the adults!

Anyway, thanks for dropping by and I hope to be back soon.


Friday, 25 November 2011

Baroque Noel

This afternoon I've been to Jacqueline's to get some crafting done, ignoring all the chores I should be doing!, but my excuse is that with lack of sleep through pain, I'm too tired to do anything ( except craft that is!!)

The card I've made is for the Simply Stampin Challenge where they have this sketch


and the colours are from the ColourQ challenge


This is the card, and although these colours are not associated with Christmas I was happy with the outcome. What do you think?


I turned the sketch on its side and stamped the swirl onto some white card, and then layered it on some brown card. I then cut 2 strips of cherry card in different thicknesses and laid them horizontally on a white card. I inked up just the NOEL sentiment on the SU roller and stamped it onto one end of a white card strip ( using the Stamp-a-ma-jig ) that was then matted onto brown card and positioned between the cherry strips. The swirl panel was then stuck vertically across the strips. I then stamped the gingerbread men, candy canes, and baubles onto white cards and cut them out. The baubles were placed on 3D pads and placed as if hanging from the swirls, and the gingerbread men in opposing corners of the card. The one cane was added to cover an ink mark, and the other to even out the picture.


Recipe : Card = Early Espresso, Cherry Cobbler, Whisper White, and white card stock from my stash
Inks = Early Espresso, Pumpkin Pie, Cherry Cobbler, and Daffodil Delight
Stamps = Baroque Motifs, Jolly Jingles, and Hung Up on the Holidays ( borrowed from Jacqueline)
Extras = Stamp-a-ma-jig, and 3D pads

Thanks for looking at my blog today, and I hope you liked what you saw.

I hope you all have a good weekend, and I'll be back soon.


Thursday, 24 November 2011

Holly and the Ivy

What a busy week I've had so far, and sadly with no time for crafting.

This card I started on Tuesday, and have only just managed to put it together tonight. My RA has flared up and the pain is keeping me awake, so to try to take my mind off it I've tried to do something useful.

It is for the Make My Monday challenge where the theme is Christmas with Flowers, Foliage, or snowflakes, and I'll also be entering it to the Pals Paper Arts challenge #121 who are looking for Elements of Style - Pearls.


For MMM, I chose the Flowers and Foliage option, as you can see its "The Holly and the Ivy" wreath with Poinsettias studded with pearls.


I stamped numerous holly sprigs onto green card and cut them out ( which took hours!! ) and stuck them down in a circle on a square white card. Years ago from Readicuts, I bought some printed flowers sheets that came with a set of matching punches, and I've used the Ivy punch and leaves for this project, touched with some Twinkles.


I then coloured some paper flowers with a red Pro marker and layered 2 together before adding them to the wreath on 3D pads. The finishing touches were the stamped sentiment, red bow, and white pearls in the flower centers.


Recipe : Card = Garden Green and white card stock from my stash
Stamps = Docrafts and Dovecrafts
Inks = Always Artichoke and Real Red
Tools = Ivy leaf punch
Extras = Red Ribbon, Pearls, and Cosmic Twinkles


I wish all my US readers a "Happy Thanksgiving", and my UK readers a "Happy weekend!"

Any minute now I will be turned into a pumpkin so I'd better get this post done PDQ!

On Saturday I'm off to see the 3D Arthur Christmas film at the cinema with my family........Nathan says I have to sit next to him incase I'm scared!! Bless Him. I'll let you know how I get on!

Thanks for dropping by, and hope you'll stop by again soon


Tuesday, 22 November 2011

A Christmas Hoot!

Yaaaayy!! I've come Top 3 at the  Simply Stampin Challenge again. I'm so pleased and must say a big "Thank You" to the DT for choosing me.

The card I've made today is for the Clean and Simple challenge #167 where they have this sketch.

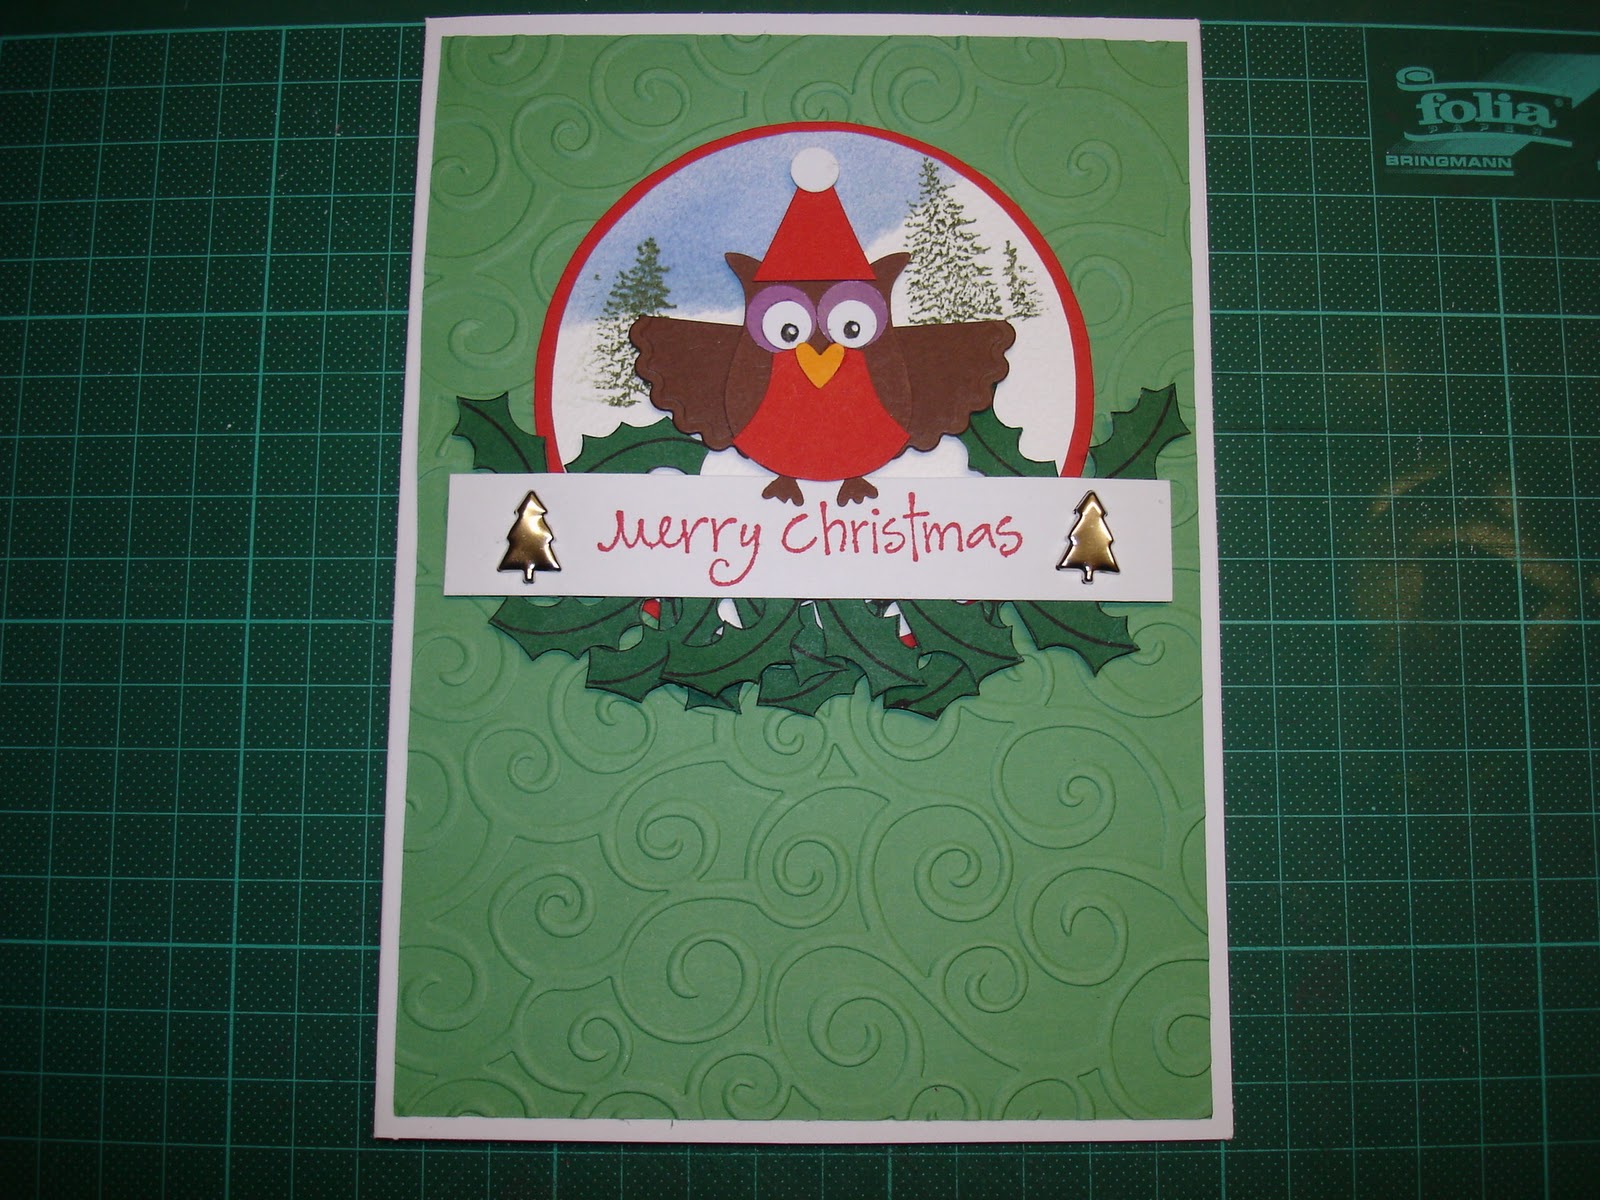
I thought for a change I'd put my stamps aside and use the cute owl I made with Jacqueline's punch a while ago.


Here he is in his Santa suit, isn't he cute?


The card started with some green card that was embossed in the BS and placed on a white card. I then sponged a blue sky over a snowy hill scene on a white textured card circle, which was then matted onto a red circle. I then stamped some holly sprigs numerous times on some dark green card and cut them out to sit along the bottom of the scene. I then stamped the greeting on some white card and placed a tree shaped brad at each end. This was then raised on 3D pads for dimension and also somewhere for the owl to perch.

Recipe : Card = Wild Wasabi, Garden Green, Real Red, Chocolate Chip, Lavender Lace, Pumpkin Pie, Whisper White, and white card stock from my stash
Stamps = Dovecrafts and Docraft
Inks = Bashful Blue, Always Artichoke, Real Red, Basic Black, and White Gel pen
Tools = Big Shot, Swirl embossing folder, Owl Punch
Extras = Tree Brads


Thanks for dropping by today, and as tomorrow is my Super Hero day with Nathan,  I'll be back in a few days time.


Sunday, 20 November 2011

Butterfly Birthday Wishes

Today I have made a card that I will be entering into two challenges.

The first is the Mojo Monday #215
where they have this sketch

and the second is Color Throw down #168
where we have this 4 colour palette

Here is my card


First I put some red card through the BS to emboss flowers on it, and then mounted it on a cream card. I  then embossed some grey, yellow, and off white cards in different folders, sponged their edges and matted strips on the right hand side of the card .


Here's a closer veiw of the different embossing textures, although it's not very clear on the red card ( I forgot to use the tan matt!!)

My BS was working hard for this card as it then cut 3 multi layered yellow flowers and a large off white butterfly. If only the BS could do all these things without me having to crank the handle !!!

  
The flower parts were layered up, the large stuck flat, and the 2 smaller ones with 3D pads for dimension, and then arranged at the ends of the strips with some grey leaves cut with the 2 step Bird punch. The butterfly's wings were sponged with yellow and red inks and stuck between the flowers by its grey sponged body to leave the wings dimensional. To finish the sentiment was stamped in red on the off white card, 3 red gems added to the flower centers, and 3 yellow gems added in the bottom corner.


Recipe : Card = Real Red ( I don't have Red Riding Hood), So Saffron, Basic Grey, Very Vanilla, and a cream card from my stash
Inks = Real Red, So Saffron, and Sahara Sand ( I don't have grey ink)
Stamps = Verve
Tools = Big Shot, CREA lies Flower Die, Marianne Butterfly die, Sizzix Texture flower plate, Swirl, Budding Vine and Butterfly Kisses embossing folders, and 2 Step Bird Punch
Extras = Red and yellow gems


Well this took quite a while to piece together, what do you think? I hope you like it

For some strange reason Blogger wont allow me to post my Labels list, so when it's behaving again I'll add my lists


That's me for today, and I've got some busy days ahead, but I'll be back as soon as I can.

Thanks for dropping by


Saturday, 19 November 2011

Santa is coming!

Today's project is for three challenges.

The first is using the colours from the
ColourQ challenge #111

and the second is the sketch from the
CAS-ual Fridays challenge CFC #29

and third, I will also be sending it to the St Luke's Charity challenge where the theme is Christmas


This is my card


I started by stamping Santa's sleigh and filled it with the presents on some white card, masked it with a Post It note and stamped the fir tree behind it. The presents were coloured with write markers, and the edges of the card sponged before layering it onto the maroon card.


The sentiment and snowflakes were then carefully inked with a Versamark pen and stamped below it ( positioned with the Stamp-a-ma-jig ) and heat embossed with white powder. It all was then placed on a white card.

Recipe :  Card = Whisper White, Rich Razzleberry, and white card stock from my stash
Stamps = Lovely as a Tree, Loads of Love Accessories, Jolly Jingles Roller, and Clarity
Inks = Pear Pizzazz, Pumpkin Pie, Rich Razzleberry, Brown Pro marker ( I dont have Crumb Cake but this was the nearest I have ), and Versamark
Tools = Heat gun and Stamp-a-ma-jig
Extras = White embossing powder

I hope you're all having a good weekend, and thanks for dropping by.