Pages

Monday, 31 October 2011

Fresh cuts

Happy Halloween everyone! I know most people will be Trick and Treating tonight, but I went last night with Nathan ( my 4year old nephew) and we had a great scary time. I wont show you the photos till the end of the post or else they'll scare you away!!!!!


Today's card is my entry for the Clean and Simple challenge #164 where they have this sketch.


Have a look 


I started by stamping the script text onto white card in green ink, and colouring the flower heads in pink ( I just love green and pink together). This was then layered onto pink card and placed on a white card base. I then cut some pink and white flower shape nestabilities in the BS, layered them, and stamped the leaf sprig in green, and added a cut out flower head, and then placed it on 3D pads for dimension. To finish I made the sentiment banner and stuck this across the stamped image again on 3D pads.


Recipe:
Card = Whisper White, Blushing Bride, and white card base from my stash
Stamps = Fresh Cuts and Verve
Inks = Lucky Limeade and Blushing Bride
Tools = Big Shot and Flower nestabilities
Extras = 3D pads


 Now for the scary photos, so log off now to save yourself!!!


This is Nathan in his "skelington" suit! ( but he wouldn't wear the mask as it was too scary for him. He did wear it as a headscarf in the next photo though!)
This is Nana with Sophie my 6 month old niece in her witch's wig


and this is me, as a witch, with Nathan and Erik, his Vampire bat!!. The Pumpkin wand I'm holding has got Nathan's home made bat, Fin Dink,  hanging from it, and this is what he'll use as a frightening trick if somebody doesn't give him a treat. Luckily, Fin Dink was not needed as his "bat bag" got stuffed full of goodies!!


 Well that's it for today, Thanks for looking, and I apologise if the photos were too much for you.


Sunday, 30 October 2011

Birthday wishes

Today , while watching the Grand Prix, I've made a card for the ColourQ #108 challenge where they have this photo for colour inspiration. The challenge ends at Noon so I hope I make it in time!!!


I've decided not to go with the Halloween theme, and have made a floral Birthday card instead.


Here it is


I stamped the large flower in black on peach and cream card, and then cut out the different segments before sticking them together with 3D pads for dimension. The same was done with the smaller flowers on yellow and cream card. The sentiment was stamped on cream card layered on peach card with some black ribbon behind it which was then tucked in behind the layers of black and cream card matts. The cream matt had been through the BS in an embossing folder. 


 Recipe :  Card = Basic Black, So Saffron, Daffodil Delight, Peach Parfait, and white card from my stash
Stamps = Playful Petals and Verve
Tools = Big Shot and Budding Vine embossing folder
Extras = Black ribbon and 3D pads


I'm off Trick and Treating later dressed as a Witch, and Nathan is going as a skeleton!!  I'll let you know how it goes.


Thanks for looking at my blog today, and I'd love it if you have time to leave a comment.

I'll be back soon


Thursday, 27 October 2011

Dandelion Trio

Well I'm a little tired today after playing with Nathan yesterday, but at least we've got our costumes ready for Trick or Treating at the weekend. He's so excited, I just hope he doesn't get too frightened by all the gruesome costumes of others doing the same!!


Anyway, today's card is for the Clean and Simple challenge #163 where they have this sketch.


So I started with a white card and Versamark stamped on it three dandelion seed heads and heat embossed them with gold powder, and then did the same with the sentiment. Simples!!


Here's the card


Recipe : Card = Whisper White
Stamps = Personal Impressions
Inks = Versamark
Tools = Heat Gun
Extras = Gold embossing powder

I'm off to Jacqueline's tonight to have a crafting session so I'd better get my stuff together.

Thanks for dropping by, and I'll be back with more creations soon.


Tuesday, 25 October 2011

Howling Halloween

A miracle has happened today..............I went around to my friends (Jacqueline's) house for our usual Tuesday get together and craft, and for once I actually managed to do a card!! I know, I amazed myself!! There was a slight hiccup, which I'll keep till the end of the post.

So, the card is for the Make My Monday Challenge. The theme is still Autumn, but the added rule this week is a colour scheme of Black and Orange, and an optional extra of Halloween.

Here's my entry


I started by cutting out a moon from a Post It and sticking it at the top of  a piece of Silk coated card. I then Versamark stamped the wolf and tree of my design ( the tree is an Autumn tree!) and heat embossed them in black powder. With some scrap paper I tore a rough shape and sponged over the edge to create a Craggie rock for the wolf to stand on. I moved the torn paper and did the same effect several times so that the rocks got darker nearer the front of the scene. The evening sky was then sponged in orange and black, the Post It removed and two clouds sponged slightly encroaching across the moon. A grave stone ( drawn around the end of my metal ruler!) was sponged onto some more silk card and I wrote RIP above a sponged crucifix, before cutting it out and sticking it in the foreground. The finishing touch was the Halloween sentiment and the matts of orange and black onto a cream card.

 
Recipe:  Card = Pumpkin Pie, Basic Black, and silk coated and cream card from my stash.
Stamps = Wolf and Tree of my design, and Halloween borrowed from Louise
Inks = Basic Black, Pumpkin Pie, and Versamark
Tools = Heat Gun   ( No Big Shot today sadly)
Extras = Black embossing powder, and Post It


Now, my hiccup today..........not only did I forget Louise's birthday last week ( Belated card picture in my post on Saturday ) but I forgot to take my card with me today to give her!! I'm so sorry Louise, I'm going senile in my old age!.

Off to spend the day with Nathan tomorrow, and to sort out our costumes for Trick and Treating at the weekend, so I'll be back in a few days when I hope the tackle some more challenges.


Thanks for looking at my post today, and I'd love to know what you thought about my card.


Sunday, 23 October 2011

Feeling Square??


This is the second post of the day, and I made a card for the Pals Paper Arts challenge #116 where they had this square card sketch.


I was again using my new stamps, and some of the smaller stamps made me think of the swinging 60's, so that was my starting point for the colour scheme.


Here is the finished item


Instead of straight lines on the squares I decided to use a labels nestabilitie. Using a square white card as the base I cut the nestabilities shape at the corners and then randomly stamped in black the circle and flower shape before colouring them in with SU markers. With the BS I cut three labels, coral, green, and white, and the later was put through in an embossing folder, and then all stuck in the center of the base card. I then stamped the large flower several times on white card, coloured them in, and cut out 4 different layers. The first two were stuck on the embossed label, and then the center circle and flower were stuck on with 3D pads to give dimension. As the background is so busy I decided not to put a sentiment on this card so it is useful for all occasions.


Recipe :  Card = Whisper White, Calypso Coral, and Pear Pizzazz
Stamps = Playful Petals
Inks = Black, Calypso Coral, Pear Pizzazz, Blushing Bride, and Lucky Limeade
Tools = Big Shot, Labels nestabilities, and Budding Vine embossing folder


Right, I'd better go and round up all the dogs toys before they get damp.

Hopefully I'll be back soon with some more creations.


Going Dotty

I'm feeling more with it today so have had to catch up on so many things, but first, some crafting!!

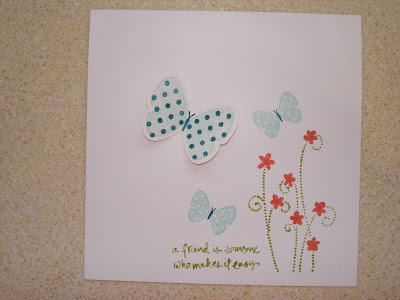
This quick little card is for the Less is More challenge where the theme is Polka Dots. I hope that Mandi and Chrissie don't think that I've over done the dots! :)


This started with a square white card where I stamped the dotty flower stems and coral flowers in the corner. I then added the sentiment and stamped two small spotted butterflies. The large butterfly was two-stamped ( using my Stamp-a-ma-jig ) on white card and punched out before being stuck down just along his body so his, or her, wings are dimensional.

Recipe :  Card = Whisper White
Stamps = Simply Said and Flight of the Butterfly
Inks = Pool Party, Island Indigo, Lucky Limeade, and Calypso Coral
Tools = SU Butterfly punch and Stamp-a-ma-jig

I'm not sure why but this card made me smile as I made it ( perhaps I am still a bit delirious??)

It's Monty's 4th Birthday today, and because he's my baby, he had a few pressies to open this morning. All, apart from one, have been eaten or ragged about and taken around the garden in his mouth to see the sites!! Bless him, he absolutely loves ducks, and here he's sat on the garden bench with a very slobbery duck.


Mon loves to take over the bench, because he has a better view of the neighbourhood cats and squirrels from up there.


Anyway, that's it for now, I'll be back later with another card.

Thanks for dropping in to my blog today, I hope you liked what I've made.


Thursday, 20 October 2011

Autumn Inchies

Today I am feeling almost human again, but it has taken me most of the day to make one card!!!

It is for the Make My Monday challenge where they are looking for a card of Autumn Inchies (one inch squares!!) including Flora and Fauna.

Here it is


I started by Versamark stamping the main image onto vanilla card and heat embossing it with black powder. It was then coloured with Promarkers and cut into nine Inchies, which were then layered on to slightly bigger Inchies of lilac and green card. I then Versamark stamped the leaf sprig several times up the edge of some brown card and heat embossed it in black. Some thin green ribbon and lilac cord were then wrapped around the bottom of the brown card and it was matted onto a square cream card. The nine pieces were matted onto the brown card with 3D pads for dimension. The sentiment was treated the same as the main image and placed on the bottom over the ribbons. I then stamped a Sparrow onto some cream card and coloured it with Promarkers, before using a brayer to stamp it's reverse image and coloured it in. They were then placed either side of the sentiment on 3D pads.


Here is a closer view of the Sparrows ( the original stamp is on the left )


Recipe : Card = Very Vanilla, Chocolate Chip, Pear Pizzazz, Orchid Opulence, and cream card from my stash
Stamps = Fresh Cuts and Papermania
Inks = Versamark, and Promarkers
Tools = Heat gun, and Speedball brayer
Extras = Black embossing powder, ribbon, chord, and 3D pads

Hopefully my new Stampin Up stuff will be delivered this weekend, and I can have a good play and find my mojo again!!

Thanks for stopping by today, and to all of you lovely crafters that have left get well messages for me.

I hope I will have something new for you to see when you call again!


Monday, 17 October 2011

One Layer card

Today I'm suffering with a terrible migraine so it's lucky that I drafted this post yesterday as my eyes cant stand the light of the screen.

I'd made a quick card for the OLW #68 challenge where they want "something triangular".

I also wanted to make another card for St Luke's Charity cards challenge where their theme is still "Something for the boys", so I thought of making a card with a Postage stamp as the image. 

Take a look


I have a stamp of a postage stamp, but it's an oblong shape, so I stamped one corner of it pointing upwards in the center of a square card, masked this off with Post its and added a line of the perforations to join it up across the bottom. The triangular frame that this made was then masked off and the aperture sponged with blue ink. I then added the 1st in the corner and stamped a dragonfly, and flower heads along the bottom. This simple card was finished with the sentiment underneath .

I don't know if stamp collecting is still popular, or whether computers have taken over?, but I hope that the masculine vibe of this card will mean something to someone.

Recipe : Card = white card from my stash
Stamps = SU Organic Grace, Clarity, and Verve sentiment
Inks = Bashful Blue, Basic Black, Green Galore, and Sahara Sand
Tools = Post Its

Thanks for your visit today, I hope you can come back soon to see what else I've been up to.


Saturday, 15 October 2011

Not Halloween

Today I am entering my card into several challenges. 

The colours are from ColourQ #106, and the lay

 out from Mojo Monday challenge #210,  and over

at The Kraft Journal #40 they are looking for Die Cuts.


This colour pallet is not easy for us Brits that don't celebrate or send Halloween cards, but I thought I'd have a go anyway.

Here is my card


I started with some grey card which I put through the Big Shot in an embossing folder, and then sponged the raised pattern. I used a border punch on some black card, wrapped it with some grey ribbon and bow, and added it to the top of the grey card. A strip of black card separates the embossing from the plain card. I stamped the frame in orange on white card, and added some two step roses and leaves, with a black sentiment, and stuck it down on 3D pads. The main feature is the yellow die cut butterfly in the center.

 
Recipe : Card = Basic Black, Basic Gray, Whisper White, and Crushed Curry
Stamps = Baby Blossoms and Verve
Inks = Basic Black, Crushed Curry, and Only Orange
Tools = Big Shot, Martha Stewart Punch, and Marianne Butterfly die
Extras = Ribbon and 3D pads


This morning my friend Jacqueline held a Stampin Up party, and our demonstrator, Paula, let us have a play with some of the new stuff from the latest catalogue, and this is the card we made.

I've ordered more than I should have, but crafting is my only vice ( honestly it is!!!) and I can't wait till it all arrives.

Thanks for looking at my blog today, and I hope you can come back again


Friday, 14 October 2011

Reindeer Christmas


Today I've made yet another Christmas card, and I'm entering it in to mSimply Stampin Challenge#28 where they had this sketch.

I'm pushed for time so hope I make the deadline.


Anyway, here is my take on the sketch


The reindeer was stamped on white card and coloured with Pro markers and a gem added for his nose.
The large fir tree was  Versamark stamped on green card and heat embossed with white powder, as were the trees on the red card. The sentiment was stamped in red on a disc of white withe the edges sponged in green. The holly was treated the same way. All the cards were layered as per the sketch on a cream square card, with the 2 discs being stuck on 3D pads to add dimension.


I hope you like him as much as I do.


Recipe : Card = Garden Green, Real Red, Whisper White, and cream card from my stash
Inks = Basic Black, Versamark, Real Red, Hunter Green, and Always Artichoke, and Pro markers
Stamps = Lovely as a Tree, Clarity, and Woodware sentiment
Tools = Heat Gun and Martha Stewart punch
Extras = White embossing powder and red gem


Thanks for dropping by today, and I hope you have a good weekend.

See you soon


Thursday, 13 October 2011

Autumn Tree

Yaaaayyy!! I've come Top 3 again at Make My Monday challenge. Thank you so much ladies, I'm really chuffed!.

This afternoon I've finally got some time to craft, and I am going to enter my card today into several challenges as they all have similar themes.

My first is for Make My Monday challenge #19 where they are looking for Autumn Trees,

Pals Paper Arts PPA115  and

Stampin Royalty#93 where they have these Autumn photos as inspiration.

So here is my card


I started with some cream card on which I randomly and lightly stamped a leaf  and ink splats in 2 colours, and sponged over it and the edges. I then stamped a tree of my own design and coloured it with Pro markers. A sheer gold ribbon was wrapped around this card, the opposing corners were rounded, and then it was layered on to some tan and maroon cards before placing on a cream card. A small leaf was then stamped on some cream card in 5 colours and coloured with an Aqua painter, and each one was cut out and stuck at the bottom of the tree except for the 5 that have not blown from the branches yet!. The finishing touch is the birthday sentiment.


Here is a close up of the fallen leaves and the lightly stamped background.

Recipe :  Card = So Saffron, Cherry Cobbler, with tan and cream cards from my stash
Stamps = Lovely as a Tree, French Foliage, Verve, and my own tree.
Inks = Chocolate Chip, Cherry Cobbler, Rich Razzleberry, Crushed Curry, Adirondack Black and Rust, and Tea Dye Distress Ink
Extras = Aqua painter, Brown Pro marker and sheer ribbon

I love the warm leaf colours and hope you like it too.

Thanks for dropping by today, and please call back when you can.


Sunday, 9 October 2011

Voucher Win

Hi everyone, I just want to tell you about the chance for you to win a $20.00 voucher over at the kraft Journal blog. All you need to do is pop over by clicking on the link and follow one or more of their instructions ( I already have! ). That's all there is to it!!      So you've got to be in it to win it, and good luck.

Saturday, 8 October 2011

Free birds

It's a funny old day again today, sunny but very windy..........still the rain is staying away so that's something I suppose!!

Today I've made a card that I'll be entering in for 2 challenges. The first over at the ColourQ challenge  gave me the colours to use, and the second at

 Cas-ual Fridays has a quote as
the inspiration in honour of one of their DT partners, Julie Ranae, who has had to endure extensive dental surgery.


So here is my card, and then I'll tell you how it was put together


I started by cutting 2 large ornate labels in the BS, layering the white on top of the brown, and then stamping the bird cage on the white with Versamark and heat embossing it with black powder. This was placed on the right of a white card. Next, using the Stamp-a-ma-jig, I stamped the blossom branches in green on the card and stuck on punched lilac flowers where the blooms are.


One escaped bird (facing right) was stamped on some brown card in black, the other (facing left) was done by inking up the stamp and rolling over the image with a brayer, and then rolling the transferred image onto the card, this results in a mirror image of the original.


Here is a close up of the birds, and they were stuck on with 3D pads for extra dimension.


The word 'smile' ( just for Julie) was written on some white card and again cut into a label and layered on a brown label, and a flower and leaves were added before it was also stuck on 3D pads.


Recipe: Card = Chocolate Chip, Wisteria Wonder, and Whisper White
Stamps = Papermania Tweet, and SU Garden Silhouettes
Inks = Versamark, Basic Black, and Pear Pizzazz
Tools = Stamp-a-ma-jig, Big Shot, SB Labels nestabilities, Fiskars punch, Speedball Brayer, and Heat gun
Extras = Black embossing powder, 3D pads

Well what a day I've had!!....... there must be something in the water as it's not only Julie, but my poor friend Pat, who had been up all night with terrible toothache. So this morning I took her to the emergency NHS drop-in clinic for some treatment. After waiting for what seemed like a lifetime, she was seen, and it turned out that she has an abscess under her tooth and is now on anti biotics.

I hope to have a restful day tomorrow and get chance to craft, so enjoy the rest of the weekend and I'll be back soon.

Thanks for dropping by, and I'd love to receive any comments if you have the time to write one.


Friday, 7 October 2011

Resisting Autumn

This afternoon I have finally finished the card I started at my friends yesterday.

I am going to enter it in the Make My Monday challenge where the theme this month is Autumn, and this week it requires the use of a "resist technique". Also I will send it to the St Luke's Charity Cards Challenge where they want "something for the boys".

Here is the card


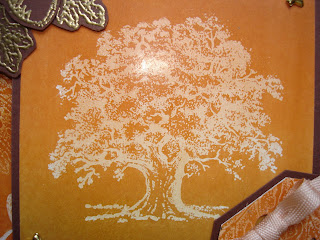
I started by randomly stamping Oak leaves and Acorns in Versamark on some silk card, and then brayered over it with a brown and green Big and Juicy ink pad. I did the same to the lone oak tree. The silk card was then cut into the large matt and small tag and layered onto some brown card. Some beige ribbon was wound around the large matt before it was stuck on the base card. To make the card more masculine two star shaped brads were added to opposite corners of the tree panel, and the bottom of the tag below the stamped sentiment. The tree, and tag were positioned on 3D pads to add dimension. I then stamped the oak leaf and 4 acorns onto brown card and heat embossed them with gold powder, cut out, and placed on the card on 3D pads. The finishing touch was a bow to attach the tag to the tree panel.


Here is a close up of the oak tree to show how the Versamark resists taking in the brayered ink to leave a ghostly image.


I'm quite pleased with the result and hope you like the card too.

Recipe : Card = Clarity silk card, SU Chocolate Chip, and cream card from my stash
Inks = Versamark, Big and Juicy Spice, and Chocolate Chip
Stamps = Lovely as a Tree, All Natural, and Verve
Tools = Speedball Brayer and heat gun
Extras = Gold embossing powder, 3D pads, beige ribbon, and gold star brads

It's a Grand Prix weekend but the TV coverage starts at silly o'clock in the morning so I dont think I will be crafting while watching it in bed!!

Hope you have a good weekend whatever you're doing, and I'll be back soon.