Pages

Showing posts with label Workshop. Show all posts

Wednesday, 10 July 2013

Workshop Tunnel card

Today I have a tunnel card to show you that I made at our monthly workshop. I used the colours from the challenge at Dynamic Duos
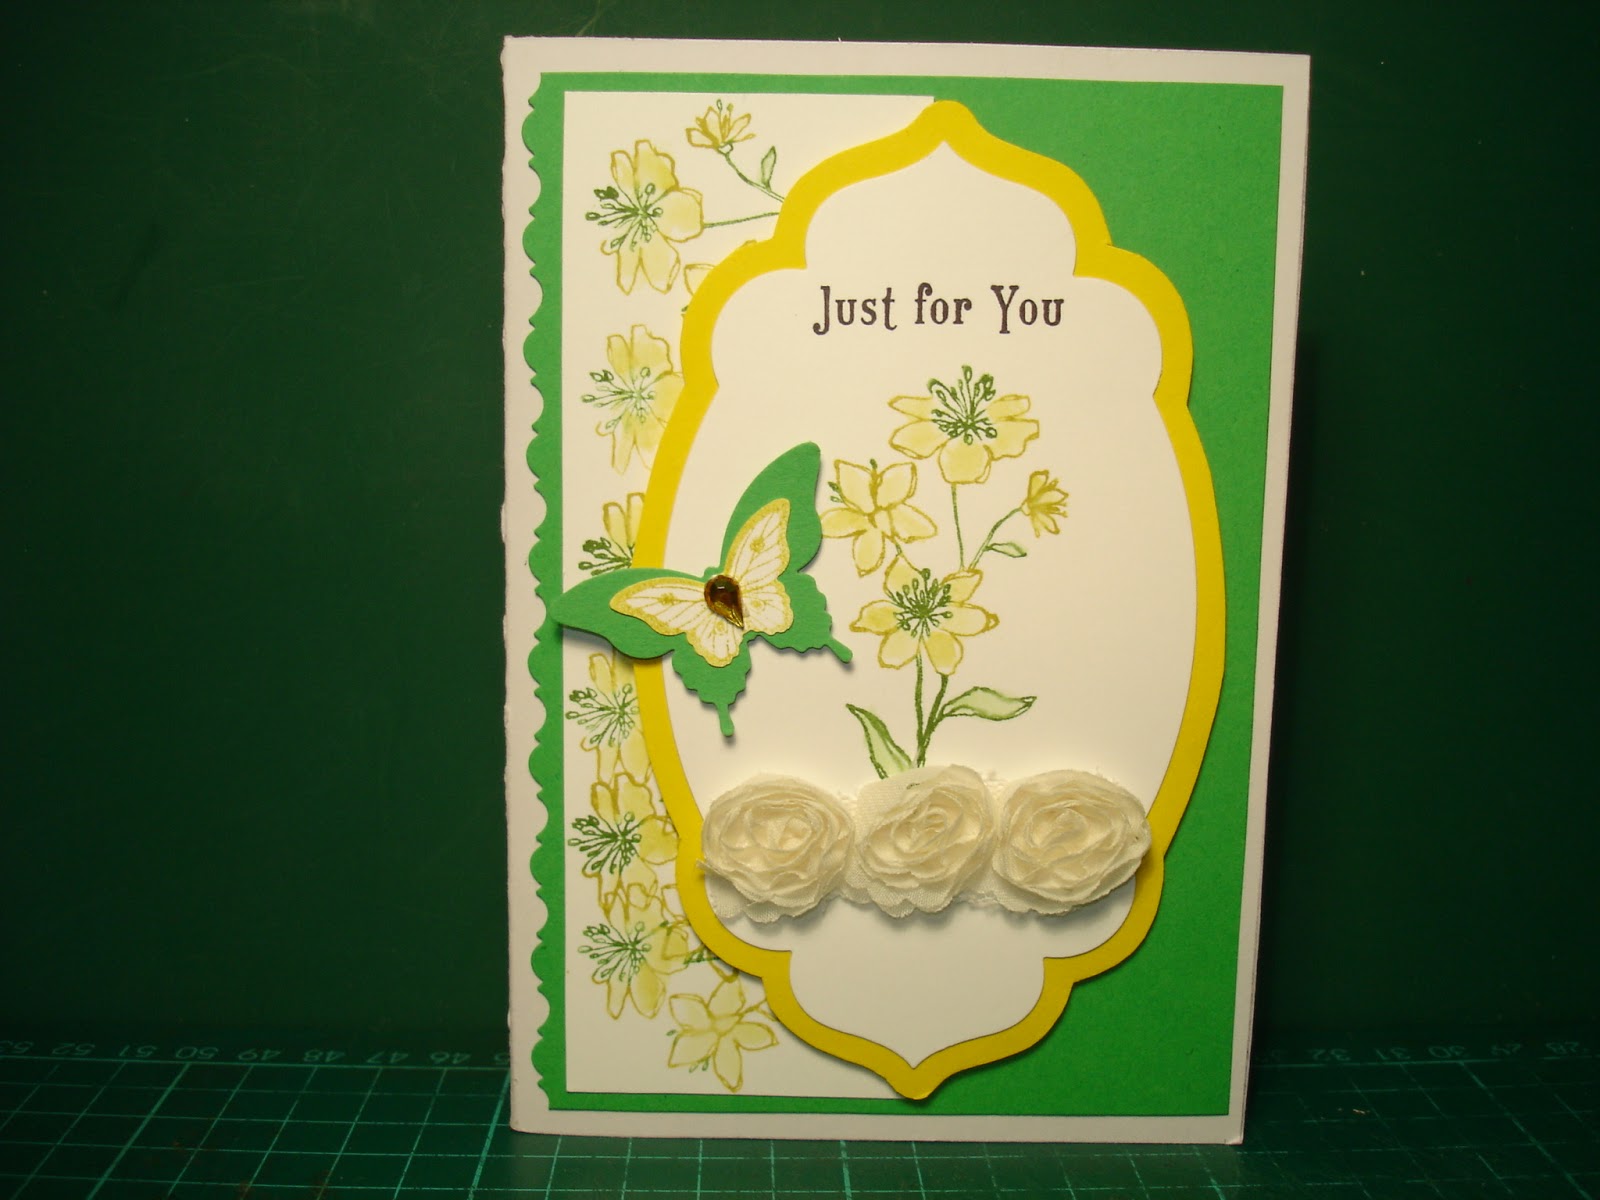
This is the front
The green card was cut along one edge with fancy scissors, and a white strip of card added that had been  repeatedly stamped with flowers and softly coloured with an Aqua Painter. The same flowers were stamped on a Nestie, with added butterfly, sentiment, and rose ribbon.
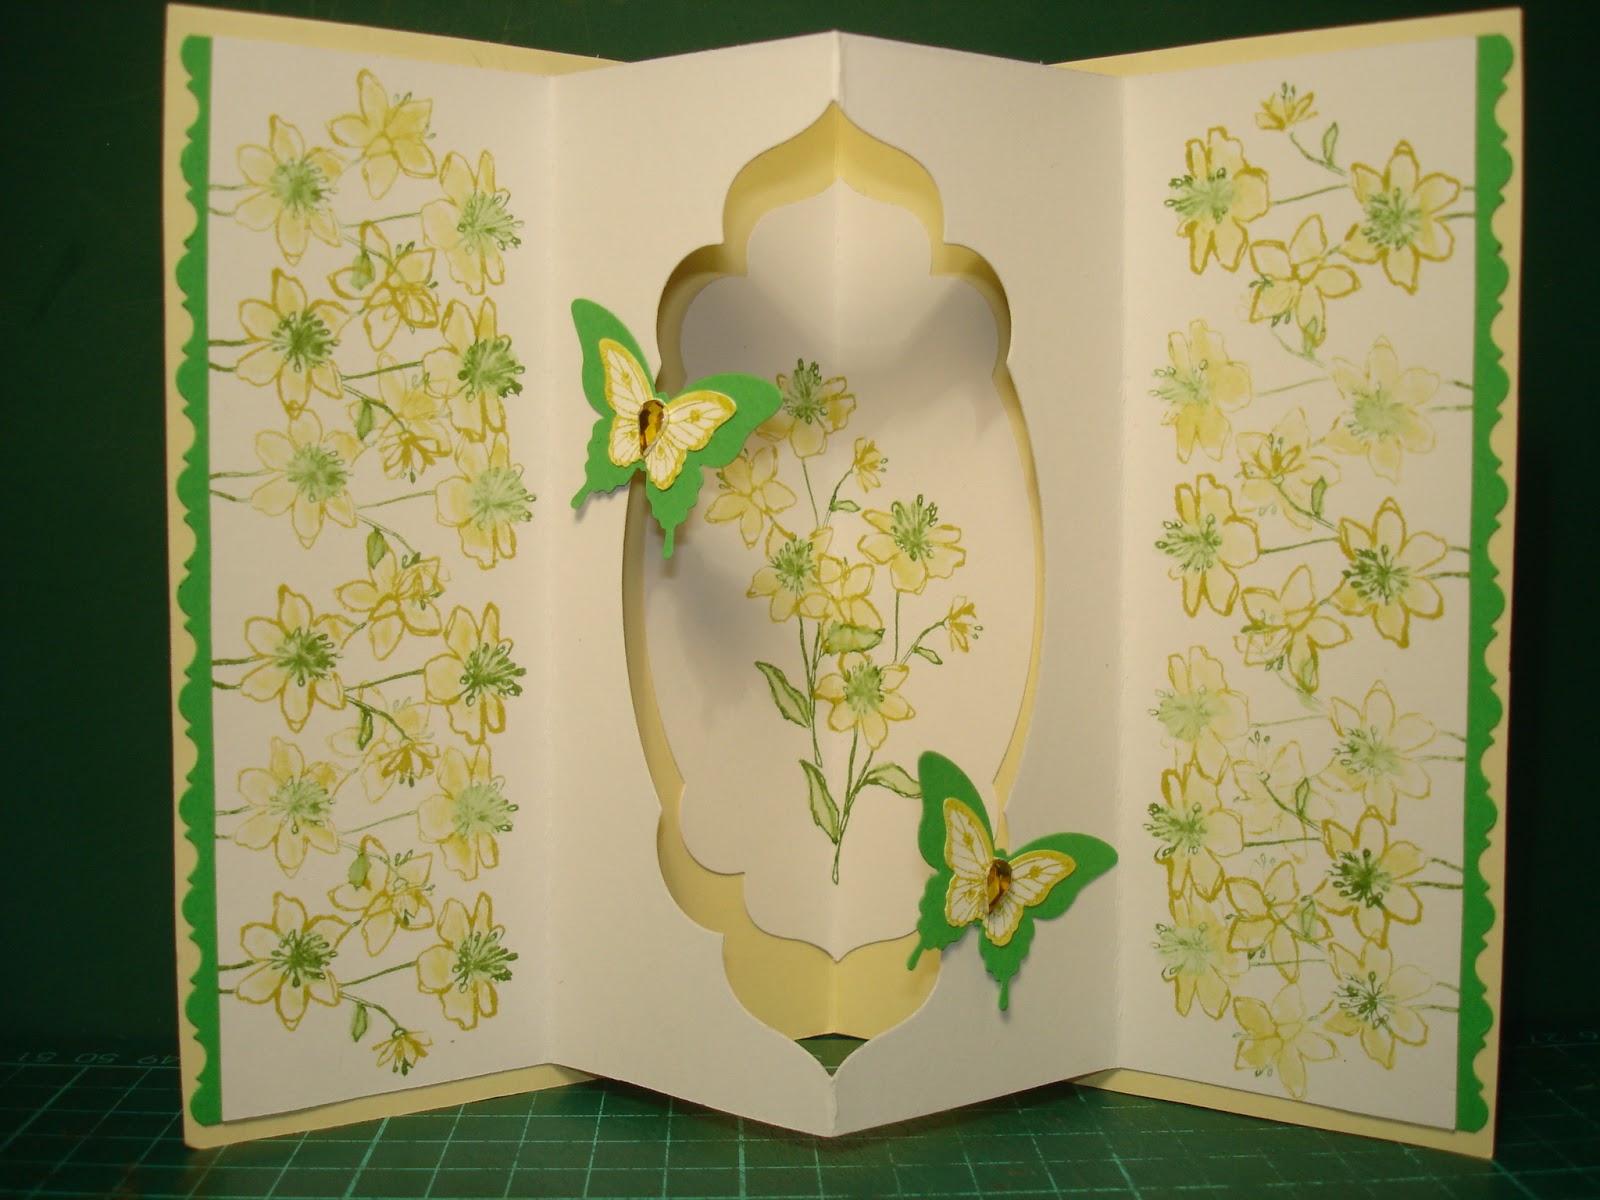
This is the tunnel inside. Again the repeating flowers were coloured with an Aqua Painter, and the edges defined with green fancy cut card. The butterflies with gem bodies are hovering over the die cut aperture.


The details of how to make this card have been posted on The Craft Club blog by our lovely friend and SU Demonstrator, Jacqueline. Click here to look at her awesome blog

Supplies :
Card = Gumball Green, Whisper White, Yellow and Ivory base FMS
Stamps = Simply Soft and Tea Shoppe
Inks = Black, Gumball Green and Summer Starfruit
Tools = Big Shot, SU Nesties, Fiskars Scissors, Bitty and Elegant Butterfly Punches
Extras = 3D Pads, Yellow Gems, and Rose Ribbon

I'm still having Internet problems, so please bear with me while I try to get the gremlins out.

Thanks for dropping by, I'll be back soon


Tuesday, 12 March 2013

Butterfly Stripes

This is my card of today, and I'll be sending it in for these two challenges:


Dynamic Duo's who have these colours, and

Simply Less is More  who want a ONE LAYER CARD with
             
            SPOTS AND STRIPES


Here is my card


First, I stamped the flowers with their spotty stems and added a few extra blue flowers. Then I stamped the two small butterflies, and added the sentiment to the bottom one. Next, I used my butterfly punch to make a shaped hole in some scrap paper, and positioned it near the centre of the card. I masked off a strip across the aperture and sponged along it with blue ink, then moved the masks and sponged in the gap with green ink, and continued along the whole area. When I removed the masks, I was left with white stripes as well which I quite liked so left them alone. The last thing was to stamp the body and spots on the wings of the large butterfly.

Supplies :
Card = White card FMS
Stamps = Simply Said and Flight of the Butterfly
Inks = Lucky Limeade and Pool Party
Tools = Butterfly punch, sponges and masking tape

                  #                                       #                                      #                                  
     
I had forgotten to post this card. It was what we made at our Tuesday workshop.


The image was stamped onto some White card which was then cut up into nine tiles. The edges of these were sponged and then placed onto card brown card with a gap in between each one, then onto some blue card with a scalloped top. This was then placed on some DSP and wrapped with a green ribbon.

Supplies :
Card = Bashful Blue, Tan and White cards FMS
Stamps = Upsy Daisy and Verve
Inks = Gumball Green, Pool Party, Bermuda Bay, and Tea Dye TH ink
Tools = Martha Stewart punch
Extras = ribbon and 3D pads

I'm in hospital for my RA treatment again on Wednesday so I may be off blogland for a few days while I recover in bed. I'm sorry that I haven't had chance to blog hop lately, but you can see by the times that I have posted my last few entries, just how late at night they have been, and I don't think the match sticks keeping my eyes open can hold for much longer!.

Have fun crafting, and I hope to be back as soon as I can to leave some comments.


Tuesday, 12 February 2013

Pink Diamond

Hi All!

Today was our Club workshop where we were making Diamond fold cards.

I decided to make mine as an early Mothers Day card and combine it with a new challenge blog I've found over at The Play Date Cafe where they have this colour palette for us.

 Cranberry . . . Raspberry . . . Petal


This is my card. Cherry Cobbler ( Cranberry ), Melon Mambo (Raspberry), and Pretty in Pink (Petal)


                          and here is a side view 


This is the card inside a box I've made with an acetate wrap, and with ribbons across opposite corners topped with a bow to keep the box from sliding out of the wrap.


            Here is a photo of the side of the box


First I scored some white card to create the central diamond, and then I decorated the ends with cards that had been border punched, and added ribbon. I used Jacqueline's SU dies for the layered central panel, which I then decorated with flowers that I'd stamped onto white card and cut out, and arranged with the middle flower raised on 3D pads and a bow, all under the MUM sentiment. I made the box bottom in white card, and scored some acetate to make the wrap.

Recipe :
Card = Cherry Cobbler, Pretty in Pink, and Whisper White
Stamps = Ornate Flowers and Papermania sentiment
Inks = Melon Mambo, Pretty in Pink, and Certain Celery
Tools = Cuttelbug ( Jacqueline's ), SU Dies, and Martha Stewart punch
Extras = Acetate and Ribbons


As I mentioned the other day, I'd helped Nathan make a valentine card for his friend Adelaide. He did all the designing and stamping himself, even though I was there to help him, he told me that he wanted it done "his way, or no way!!", the little Diva.

What do you think of his talents? I wonder where he got them from?


He even decorated the inside.

The inks and majority of the stamps are SU, but there are a few toppers and unknown stamps that Boris the Elf had sent him!!


Well that's all for now, I'm hopefully having my hospital treatment tomorrow, so I'll be back soon.

Have a great weekend whatever you're doing


Wednesday, 9 May 2012

Mellow Yellow

Yesterday was our craft club and we made a Spring Fold card which I will be entering into the Less is More challenge where the theme is Yellow


Here is my card


And here is a side view


Recipe  :
Card = So Saffron, Daffodil Delight, and Very Vanilla
Stamps = Fresh Vintage and Verve
Inks = Pear Pizzazz and Crushed Curry
Tools = Cuttlebug and die ( Jacqueline's ), and scoring tool, and bone folder
Extras = Cream and yellow ribbons


When I left Jacqueline's club yesterday afternoon, I had to drive down her country lane, which I do every Tuesday, however, this time I encountered a suicidal black and white cat.......now I am a dog lover and cant stand cats ( except Louis, Jacqueline's cat) but I would never hurt one, so being a softy I braked hard to allow the stupid creature to leap to safety. I was relieved to see it scamper away and was quite pleased with myself for avoiding it and I felt happy at doing a good deed..................then my mood seriously changed when I got home........as I opened my cars back door I was met by the entire contents of my craft bag lying across the back seat, a nightmare as you can imagine!!...........but then............AAAAAHHHHH!!!!!!!!, my bottle of apple and blackcurrant juice had spilt and covered everything from my bag, the rear foot well, and the back seat!!!!......all thanks to that darn cat!!!!

It has taken hours for the car to dry after I sponged everywhere with warm soapy water, and I wont go there to list what I've had to throw away!!

Anyway, my friend is back from Jamaica now, so my Mum Sitting duties are over and I've got some time to myself, and once my chores are done ( Yuk! ) I hope to do some crafting.


Thanks for dropping by today


Wednesday, 8 February 2012

Flower Pot cards

Hi crafters, I think I've finally managed to sort out changing all my email address and passwords everywhere now, so it's nearly business as usual. Thanks for all your patience and good will messages.

Yesterday at our Craft club we made a flower pot card, and I made mine with Mother's Day in mind.


When the flowers are pulled up they reveal the insert with the message.


I added a piece of card on the back like a photo frame to support the card to stand upright. I then made another one for my sister to give to her Mum in Law.


Most of the flowers are die cuts, but the pansies were made with the SU large butterfly punch. Two yellow shapes were sponged with lilac ink and stuck on top of each other in different directions, and the centres coloured with write markers and finished with gems.

Recipe :   Card = SU Cherry Cobbler, Orchid Opulence, Pretty in Pink, Wisteria Wonder, So Saffron, Pear Pizzazz, Very Vanilla, and Terracotta from my stash
Stamps = sentiments borrowed from Jacqueline and Joan
Inks = Wisteria Wonder, Regal Rose, Pear Pizzazz, Chocolate Chip, and TH Tea Dye
Tools = Big Shot, Spellbinders shapeabilities, CreaLies die, SU Build a Blossom and Butterfly punches, SU and Martha Stewart border punch
Extras = Ribbon, gems, and padded hearts


I hope the Mums like them?

I've not got alot of time tomorrow, but I will try to show you what else I've been up to, so please call back if you can.

Thanks for looking here today


Thursday, 10 November 2011

Workshop Christmas cards

Would you believe it, I've had another busy day so have not had time to craft, so instead here are the other two cards we made at our Tuesday workshop run by Jacqueline. Click here to visit her fabulous blog to see the details of these cards and her many other stunning creations.


The tree is dimensional and is able to lie flat to fit into an envelope.

Here it is from a different angle.


The other card is this one. Unfortunately, I messed up the stamping of the white tree so it looks thicker than the purple one, oh well.


Hopefully, I can do something tomorrow, so please call again if you can.


Wednesday, 9 November 2011

Baroque Christmas

I've not had much time for crafting again lately, but yesterday it was our craft club day, and for once I managed to make, not just one card, but three.....I know, amazing!!( mind you, it's all down to Jacqueline who did all the hard work and prepared all the elements for us)

I'll show you those later, but first here is a card that I'll be entering into the CAS-ualfridays challenge #27 where the design or embellishments go over the edge of the base card.

As I've used traditional Christmas colours of red, green, and gold I'll also be entering it to the Make My Monday challenge #23, where Christmas is their months theme, and this week it's Traditional or Vintage.

So here it is


I started by drawing around a bauble card of my friend Louise, on some red card and cut it out. The flourish was Versamark stamped on it and heat embossed with gold powder and then gems randomly added. The same flourish was then stamped in green on a 5" square white card that had opposing corners rounded, before the bauble was placed slightly overhanging the edge, as if tied to the green branch behind it. The finishing touches were the gold bow and stamped red sentiment. 


Recipe:  Card = Real Red and Whisper White
Stamps = Baroque Motifs and sentiment ( Jacqueline's)
Inks = Versamark and Real Red
Tools = Heat gun and Xcut corner rounder
Extras = Gold embossing powder, ribbon, and gems


Here's one of the festive cards we made at our workshop. I love that it's so pretty yet so simple to make, and again in the traditional red and green colours.

I'll show you the others in my next post ( if you'd like to pop back?)

Thanks for looking at my blog today, and I'll be back soon with some more projects.


Tuesday, 4 October 2011

Waterfall card

Today at our craft club we made waterfall cards, and here is my version


I started with a white 5" square card and layered it with pink and green patterned papers. A strip of cream card was then scored 5 times, and under each score line I stuck a pink card square layered with a cream square, on which I stamped a rose in 2 shades of pink. A thin strip of card was then stuck at the bottom of the reverse side and secured through the base layers with little star brads, and then all this was stuck on the base card. The frame and sentiment were stamped in pink on cream card, and some stamped roses were added around the frame, before it was stuck down on 3D pads. The finishing touch was the brad securing the pink ribbon for the pull mechanism.


Recipe : Card = Pink Passion, Very Vanilla, and white card from my stash
Stamps = Baby Blossom, and Verve
Inks = Pink Passion and Pixie Pink
Tools = Piercing tool , brads, and 3Dpads
Extras = Patterned paper and Ribbon

I hope you like what you see, and I'd love to read any comments you have.

Off to play Super Heroes tomorrow, so I'll be back in a few days. Thanks for dropping by today.


Tuesday, 13 September 2011

Snowy Shaker card

Today at our craft club workshop we were making Shaker Cards, and as my friend has asked me to make her several Christmas cards for her special friends, I decided to make her one today.

Here it is in icy blue colours

I started with a white square card and masked off the area in the center with a Post It and stamped around the edges with a spotty flourish, sentiment, and several snowflakes. I then cut a smaller square out of white card and cut out the center to leave a frame, and stamped it as the base card had. Some acetate was then stuck on the reverse side of the frame and a pine tree stamped on the plain center of the card, and a small snowflake on the acetate itself. Double sided foam tape was placed around the inside edge of the frame in a double thickness layer. White beads and Mother of Pearl star sequins were placed in the center of the card over the tree, and the frame was lowered into place trapping them within the foam tape around the acetate window. A die cut snowman was added to the front of the frame to give the window scene some depth.


Here is a close up of the window so you can see the pine tree on the backing card, and a small snowflake on the inner face of the acetate window ( very feint ). When the card is stood up the beads and sequins fall to the bottom like snow would pile up under a tree.


Recipe : Card = from my stash
Ink = SU Bashful Blue and Pro markers
Stamps = Lovely as a Tree and snowflake stamps that I had in a kit from Argos years ago
Tools = Big Shot
Extras = Acetate, 3D foam tape, Sizzix snowman die, white beads, and MoP star sequins


I'm trying not to think about Christmas, but it'll soon be upon us so I'll have to get on with my cards before I run out of time.

The Wasp man is coming back this afternoon to spray the nest again as there are a few survivers of the first treatment. I hope he gets them all this time!!!!

Thanks for dropping by today, I hope you liked what you saw.


Tuesday, 9 August 2011

Happy Birthday Owl

Hello, thanks for dropping by, I hope you like what you see.

Today at our Craft Club workshop we made a cute Owl Pop Up card, and surprisingly I managed to finish the card, all but the greetings which I've added this evening.

Isn't it cute!!


I started with a white square card from my stash and added a matt of SU Green Galore. The Owl was made with Jacqueline's SU Owl Punch in Chocolate Chip, with his wings made from a scallop circle cut in half ( Using a BS and nestabilities ), and his feathery chest was the stamped flourish from the SU Bliss set in CChip on Very Vanilla. The bunting, hat, and googly eyes were supplied by Jacqueline, and I added the occasional heart on the bunting flags. The Woodware sentiment was stamped in CChip and the bunting line drawn in a Letraset fine black pen.


The inside was lined with some more GGalore that had had 3 slits cut into the fold that were then folded in the other way to create somewhere for the owls to be stuck to. ( It's difficult to explain so I hope the photo speaks for itself?)

 I decorated the middle owl with eyelids and lashes, a pink tummy, and placed a tiara on her head.  ( This was made with a MS punch.)                                                                 Well we cant let the men have all the fun can we????                                                                                  The bunting was continued inside the card and again the sentiment was added in CChip                  
                                                                                 I hope you like the owls as much as I do-oo-oo-oo!!                                                                                                                                                       I'm sorry, I just couldn't stop myself!
 On that note I'd better sign off.


Tomorrow I'm spending the day at my sister's, so no doubt there will be some more emergencies and baddies for us Super Hero's ( Nathan and I ) to sort out, but if I'm not too tired from saving the world I may have time to make something else on Thursday.


See you again soon I hope.


Wednesday, 11 May 2011

At Last .........Another Card!

It has been a while since my last post but after being badgered by my friend Jacqueline I have decided to update!
This is a card I made at Jacquelines last workshop. It demonstrates the Black Magic technique which you can see explained over on her blog here. Basically it is black card stock stamped with white pigment ink and then coloured with pencils
Hopefully it won't be too long before I'm back again!!!
Beverley.