I'm sorry that I have not issued a post for some time, but there just isn't enough hours in a day!!!
I would just like to wish all my followers and blog friends a very Merry Christmas, and a Happy and Prosperous New Year!!!
Hopefully, Santa will bring me some nice crafting bits to play with for the challenges in 2012!!, so I'll be back then.
Merry Christmas and Happy New Year to you all!!
Monday, 19 December 2011
Sunday, 11 December 2011
Let it Snow!
Brrrrrrrrr!!! What a cold wet day outside, thank goodness I'm still putting my decorations up indoors. Now you may think that my house must look like Santa's grotto, but watch out for the photos at the end of my post and see for yourself.
Today, I've only had time for a quick card that is for the Less is More challenge and they want a
This time our theme is
Let it Snow!
So out came my snowflake stamps and sponges, and this is what I came up with

I stamped the snowflakes in Versamark across the top of the square card, and heat embossed them with white powder. The same was done with the sentiment. I then embossed 2 lines across the middle of the card and covered them with Post Its before sponging over the top area with blue inks. Gems were added for a little bit of bling.
Recipe :
Card = Whisper White
Stamps = Inkadinkado, and my stash
Inks = Versamark, Bashful Blue, and Brilliant blue
Tools = Heat gun and embossing tool
Extras = White embossing powder and gems
Thanks to my RA it takes me sooo long to do what takes a normal person only a few hours!!! but I think it makes my room look festive even if it does cause me pain to do it.
Here is my traditional red tree ( and I've just noticed the strange pale patch on the dining room curtains, and if it's not the reflection of the camera flash from the large mirror, it's a ghost ??)

and this is my fireplace, minus the large red baubles (which I hang from the top of the garland swag, and I think must still be in the loft) and the coals from the fire as Monty likes to steal them and hide them under the dining table!!

Tomorrow I'm off to Jacqueline's to play and it may be my last chance to go round before Christmas, so I'd better get my crafting stuff ready.
Thanks for dropping by and I hope you'll call again soon.

Saturday, 10 December 2011
Blue Christmas!

This afternoon, in between putting my decorations up, I took a break to have a coffee and finish the card I started yesterday.
My card is for the Pals Paper Arts challenge, and their theme is something for "Puttin' on the Ritz" with extra sparkle, shine, or decoration.
I thought of putting some "bling" on a Christmas tree, but as I don't have one in the form of a stamp, I decided to make one out of the scroll in the SU Strength and Hope set.
This is how it turned out

I started by stamping the whole scroll in Versamark on navy card and heat embossing it with a silver pearl powder. Then I reduced the size of each scroll the higher it went, till the fourth and last scroll was just the heart and leaves.

The BS was used to cut labels from the stamped navy and silver cards, that were then layered. I rounded the corners of a square cream card and a matt of pale blue card that had been wrapped with silver and navy ribbons was added, onto which the stamped panel was placed on 3D pads for added dimension. The finishing touches were the sentiment stamped in Versamark and heat embossed with silver powder, and the addition of clear gems to the tree and the "i" in Winter.

The BS was used to cut labels from the stamped navy and silver cards, that were then layered. I rounded the corners of a square cream card and a matt of pale blue card that had been wrapped with silver and navy ribbons was added, onto which the stamped panel was placed on 3D pads for added dimension. The finishing touches were the sentiment stamped in Versamark and heat embossed with silver powder, and the addition of clear gems to the tree and the "i" in Winter.
Recipe :
Card = Night of Navy, Bashful Blue, and Silver and cream cards from my stash
Stamps = Strength and Hope and sentiment from my stash
Inks = Versamark
Tools = Big Shot, Nestabilities labels, and Heat gun
Extras = Ribbons, Silver and Silver Pearl powders, and gems
Thanks for looking at my blog today and I'd love to see what you think.
Oh, and a big "Hello" and "Welcome" to my new followers, thank you for your support.
Inks = Versamark
Tools = Big Shot, Nestabilities labels, and Heat gun
Extras = Ribbons, Silver and Silver Pearl powders, and gems
Thanks for looking at my blog today and I'd love to see what you think.
Oh, and a big "Hello" and "Welcome" to my new followers, thank you for your support.

Snowmen Smiles
Today, I've put my Christmas icicles and lights up outside, and I still have to put my indoor tree up and decorate it, but I can't get in the festive spirit yet, so I've made a card instead.

 I will be entering it into the Friday Mashup challenge where they want snowmen, the colour palette of Blushing Bride, Baja Breeze, and Basic Grey, or both the snowmen and the colours.
I will also put it into the The Paper Players challenge where they are looking for a Christmas project with non holiday stamps or colours.
So here is my card with Snowmen in non traditional colours, what do you think??

I started with a white card and rounded the corners before randomly stamping snowflakes in pink and blue. I then used the BS to cut 2 Sizzix Snowmen, 1 grey and 1 blue label, and embossed the grey label with dotty snowflakes. The labels were layered, white stitches drawn on, and wrapped with a ribbon and placed on the card. The snowmen were coloured with SU write markers and had Cosmic Twinkles added before they were placed on the labels. Finally, the greeting was stamped in Versamark on blue card, heat embossed with white powder, and stuck on 3D pads between the snowmen.
Recipe :
Card = Pool Party ( I don't have Baja Breeze), Basic Grey, and White card from my stash
Stamps = Snowflakes and sentiment from a kit I've had for too long to remember where from
Inks = Blushing Bride, Pool Party, and Versamark
Tools = Big Shot, Sizzix snowman die and Texture plates, SB nestabilities labels, Heat gun, and Xcut corner rounder
Extras = Pro Markers, Cosmic Twinkles, Ribbon (coloured with Blushing Bride marker), White gel pen, and 3D pads.
Thanks for dropping by today, and I hope you liked my card.
I must let you all know that I'm having Internet problems at the moment, so if I go AWOL again it's because of that...........fingers crossed it will be ok till the new year.
Thursday, 8 December 2011
Glitter Christmas
Hello my blogging friends, I'm back in the crafting saddle but I'm not firing on all cylinders yet, so please bear with me.
Today I went to Jacqueline's, and as her challenge blog ( Make My Monday) is looking for a Seasonal project with Added Glitter, I decided to have a go at a technique I'd seen on TV done by Barbara Gray from Clarity Stamps. She uses some sticky paper ( designed and sold by her company )to create glittery scenes that then get stuck on acetate.
Here is the finished card, and then I'll try to explain how I made it!!

If I'd thought about it properly, I would have taken photos of the various stages, but I didn't think of it till the picture was complete!!!!
 Anyway, I placed 2 strips of 1.5" double sided tape side by side, sticky side face up, and stamped the reindeer silhouette directly onto the sticky side with Black Archival ink. The tape was then placed onto the rougher side of a piece of acetate. With a craft knife I carefully cut into the tape backing paper to make a thin wavy strip under the deer, and peeled off the yellow backing ( too much pressure on the knife and it will cut the acetate as well, so carefully does it)
I then sprinkled blue glitter onto the exposed sticky tape. Either side of the deer I cut 2 Christmas trees, but the first parts of the backing to be peeled off were the stripes of tinsel and baubles ( glittered with red ), then the larger trees ( pale green glitter) and lastly the smaller trees ( darker green). I then cut a wavy strip across the background and sprinkled it with silver glitter, and finally the remaining yellow backing paper was peeled off and sprinkled with white glitter.
Now, to stick this glittery scene down, I stuck 2 strips of the tape onto white card and peeled off the backing tape. The glittery side of the acetate was stuck onto the tape to leave the shiny side of the acetate face up ( so the glitter is sandwiched between acetate and white card) and the scene was then trimmed and layered on some red and green cards. The sentiment was stamped in Versamark and heat embossed with white powder on the red card, and finished off with 3 white pearls.
I hope that this all makes sense to you, but I can thoroughly recommend this technique if you fancy getting glitter absolutely everywhere!!! I think poor Jacqueline will be finding it for weeks to come ( especially as Louise seemed to like lying on it!! ) , Sorry Jacqueline.
Recipe :
Card = Green Galore, Real Red, and Whisper White
Stamps = Clarity and Dovecraft
Inks = Black Archival and Versamark
Tools = Martha Stewart border punch, Heat gun, craft knife and wide double sided tape
Extras = Blue, red, pale green, dark green, silver and white glitters, White embossing powder, and White flat backed pearls
Thanks for dropping by today, and I hope my rambling instructions haven't scrambled your minds too much.

Saturday, 3 December 2011
AWOL Apology
Hi blog friends, I'm sorry that there has been no posts from me this week, but I had a horrible reaction to my RA injection drug which really knocked me off my feet. Now I've had lots of bed rest and doggy cuddles, I'm starting to feel human again.
I also owe Jacqueline a big apology, " Sorry Jacqueline", as I let her down for the Christmas Sale at the local Village Hall, I hope she can forgive me!
And now some good news, I've also just found out that I came Top 3 at Simply Stampin again, so a big "Thank you DT" to them, and apology for no entry to their challenge this week.
I hope to get back in the crafting saddle soon, so please call again in a day or two if you can.
Thanks for bearing with me

Monday, 28 November 2011
Bling Baubles
 Here we are at the start of another week, and another week closer to Christmas! Where is the time going??
Today's card is for the Less is More Challenge where the subject is
This is my card


 First I inked up the flourish with Versamark and then I masked off the edges to make a round shape, before stamping onto a white card.
I then heat embossed the shape with gold powder ( sorry but my photo is not the best to show the gold), and repeated the process twice more ( placing the stamp by using the Stamp-a-ma-jig ). The sentiment was stamped in red across the top, and gold wiggly lines drawn to hang the baubles, and the finishing touches were the "bling gems".
I was pleased with my efforts until I drew the lines to hang the baubles, and then I realised that the right hand one is a little too close to the top one, but I couldn't do anything to disguise it, so just went with it.
Recipe: Card = from my stash
Stamps = Bliss and Dovecraft
Inks = Versamark and Real Red
Tools = Heat Gun and Stamp-a-ma-jig
Extras = Gold embossing powder, Gold Pilot marker, and gems
Thanks for dropping by, and please call again if you can.

Sunday, 27 November 2011
Fresh Cut Thank You
I just love Sundays when there is a Grand Prix on the TV, as my family know that I love them so much they always try to leave me alone, so it means that I can craft while sat on the sofa!!
Yesterday I went with my family to see the 3D film "Arthur Christmas" at the cinema, and as my sister paid for me, I've made her a Thank You card.
I will also be entering it into 2 challenges;

 The sketch is from the Clean and Simple Challenge ,
and the colour palette is from the Color Throwdown Challenge
This is my card

Extras = Ribbon and 3D pads
At the cinema we had to wear the sexy specs that make 3D what it is, absolutely brilliant! , but I dont think they'll make it onto the catwalks of London or Milan anytime soon!!.We were all amazed that Nathan and Sophie sat through the whole film without a peep, in fact Sophie went to sleep!!, but if you have kids I can highly recommend this film, there are even the odd one liners for the adults!
Anyway, thanks for dropping by and I hope to be back soon.

Yesterday I went with my family to see the 3D film "Arthur Christmas" at the cinema, and as my sister paid for me, I've made her a Thank You card.
I will also be entering it into 2 challenges;


and the colour palette is from the Color Throwdown Challenge
This is my card

I stamped the flower and text stamp on white card in brown ink, cut it into a circle and sponged the edges.The flowers were then coloured with SU Write markers and placed on a brown scallop circle made with the BS. I then drew around a plate for the dome shape on some blue card and randomly stamped the flower in red and blue on it, and the leaf sprig in brown. I stamped the sentiment frame and text in brown on white card before matting it onto brown card. This frame and the floral disc were placed on 3D pads on a square white card that had had the blue card stuck at the bottom. The finishing touch was the red ribbon.
Recipe:
Card = Bashful Blue, Chocolate Chip, Whisper White, and white card from my stash
Stamps = Fresh Cuts and Just Believe
Inks = Island Indigo, Real Red, and Chocolate Chip
Tools = Big Shot and NestabilitiesExtras = Ribbon and 3D pads
At the cinema we had to wear the sexy specs that make 3D what it is, absolutely brilliant! , but I dont think they'll make it onto the catwalks of London or Milan anytime soon!!.We were all amazed that Nathan and Sophie sat through the whole film without a peep, in fact Sophie went to sleep!!, but if you have kids I can highly recommend this film, there are even the odd one liners for the adults!
Anyway, thanks for dropping by and I hope to be back soon.
Friday, 25 November 2011
Baroque Noel
This afternoon I've been to Jacqueline's to get some crafting done, ignoring all the chores I should be doing!, but my excuse is that with lack of sleep through pain, I'm too tired to do anything ( except craft that is!!)

 The card I've made is for the Simply Stampin Challenge where they have this sketch
and the colours are from the ColourQ challenge


and the colours are from the ColourQ challenge
This is the card, and although these colours are not associated with Christmas I was happy with the outcome. What do you think?

I turned the sketch on its side and stamped the swirl onto some white card, and then layered it on some brown card. I then cut 2 strips of cherry card in different thicknesses and laid them horizontally on a white card. I inked up just the NOEL sentiment on the SU roller and stamped it onto one end of a white card strip ( using the Stamp-a-ma-jig ) that was then matted onto brown card and positioned between the cherry strips. The swirl panel was then stuck vertically across the strips. I then stamped the gingerbread men, candy canes, and baubles onto white cards and cut them out. The baubles were placed on 3D pads and placed as if hanging from the swirls, and the gingerbread men in opposing corners of the card. The one cane was added to cover an ink mark, and the other to even out the picture.
Recipe : Card = Early Espresso, Cherry Cobbler, Whisper White, and white card stock from my stash
Inks = Early Espresso, Pumpkin Pie, Cherry Cobbler, and Daffodil Delight
Stamps = Baroque Motifs, Jolly Jingles, and Hung Up on the Holidays ( borrowed from Jacqueline)
Extras = Stamp-a-ma-jig, and 3D pads
Thanks for looking at my blog today, and I hope you liked what you saw.
I hope you all have a good weekend, and I'll be back soon.
Thursday, 24 November 2011
Holly and the Ivy
What a busy week I've had so far, and sadly with no time for crafting.
This card I started on Tuesday, and have only just managed to put it together tonight. My RA has flared up and the pain is keeping me awake, so to try to take my mind off it I've tried to do something useful.
It is for the Make My Monday challenge where the theme is Christmas with Flowers, Foliage, or snowflakes, and I'll also be entering it to the Pals Paper Arts challenge #121 who are looking for Elements of Style - Pearls.
For MMM, I chose the Flowers and Foliage option, as you can see its "The Holly and the Ivy" wreath with Poinsettias studded with pearls.

 I stamped numerous holly sprigs onto green card and cut them out ( which took hours!! ) and stuck them down in a circle on a square white card. Years ago from Readicuts, I bought some printed flowers sheets that came with a set of matching punches, and I've used the Ivy punch and leaves for this project, touched with some Twinkles.
I then coloured some paper flowers with a red Pro marker and layered 2 together before adding them to the wreath on 3D pads. The finishing touches were the stamped sentiment, red bow, and white pearls in the flower centers.
 Recipe : Card = Garden Green and white card stock from my stash
I wish all my US readers a "Happy Thanksgiving", and my UK readers a "Happy weekend!"
Any minute now I will be turned into a pumpkin so I'd better get this post done PDQ!
On Saturday I'm off to see the 3D Arthur Christmas film at the cinema with my family........Nathan says I have to sit next to him incase I'm scared!! Bless Him. I'll let you know how I get on!

This card I started on Tuesday, and have only just managed to put it together tonight. My RA has flared up and the pain is keeping me awake, so to try to take my mind off it I've tried to do something useful.
It is for the Make My Monday challenge where the theme is Christmas with Flowers, Foliage, or snowflakes, and I'll also be entering it to the Pals Paper Arts challenge #121 who are looking for Elements of Style - Pearls.
For MMM, I chose the Flowers and Foliage option, as you can see its "The Holly and the Ivy" wreath with Poinsettias studded with pearls.


I then coloured some paper flowers with a red Pro marker and layered 2 together before adding them to the wreath on 3D pads. The finishing touches were the stamped sentiment, red bow, and white pearls in the flower centers.
 Recipe : Card = Garden Green and white card stock from my stash
Stamps = Docrafts and Dovecrafts
Inks = Always Artichoke and Real Red
Tools = Ivy leaf punch
Extras = Red Ribbon, Pearls, and Cosmic Twinkles
I wish all my US readers a "Happy Thanksgiving", and my UK readers a "Happy weekend!"
Any minute now I will be turned into a pumpkin so I'd better get this post done PDQ!
On Saturday I'm off to see the 3D Arthur Christmas film at the cinema with my family........Nathan says I have to sit next to him incase I'm scared!! Bless Him. I'll let you know how I get on!
Thanks for dropping by, and hope you'll stop by again soon
Tuesday, 22 November 2011
A Christmas Hoot!

The card I've made today is for the Clean and Simple challenge #167 where they have this sketch.
I thought for a change I'd put my stamps aside and use the cute owl I made with Jacqueline's punch a while ago.
Here he is in his Santa suit, isn't he cute?
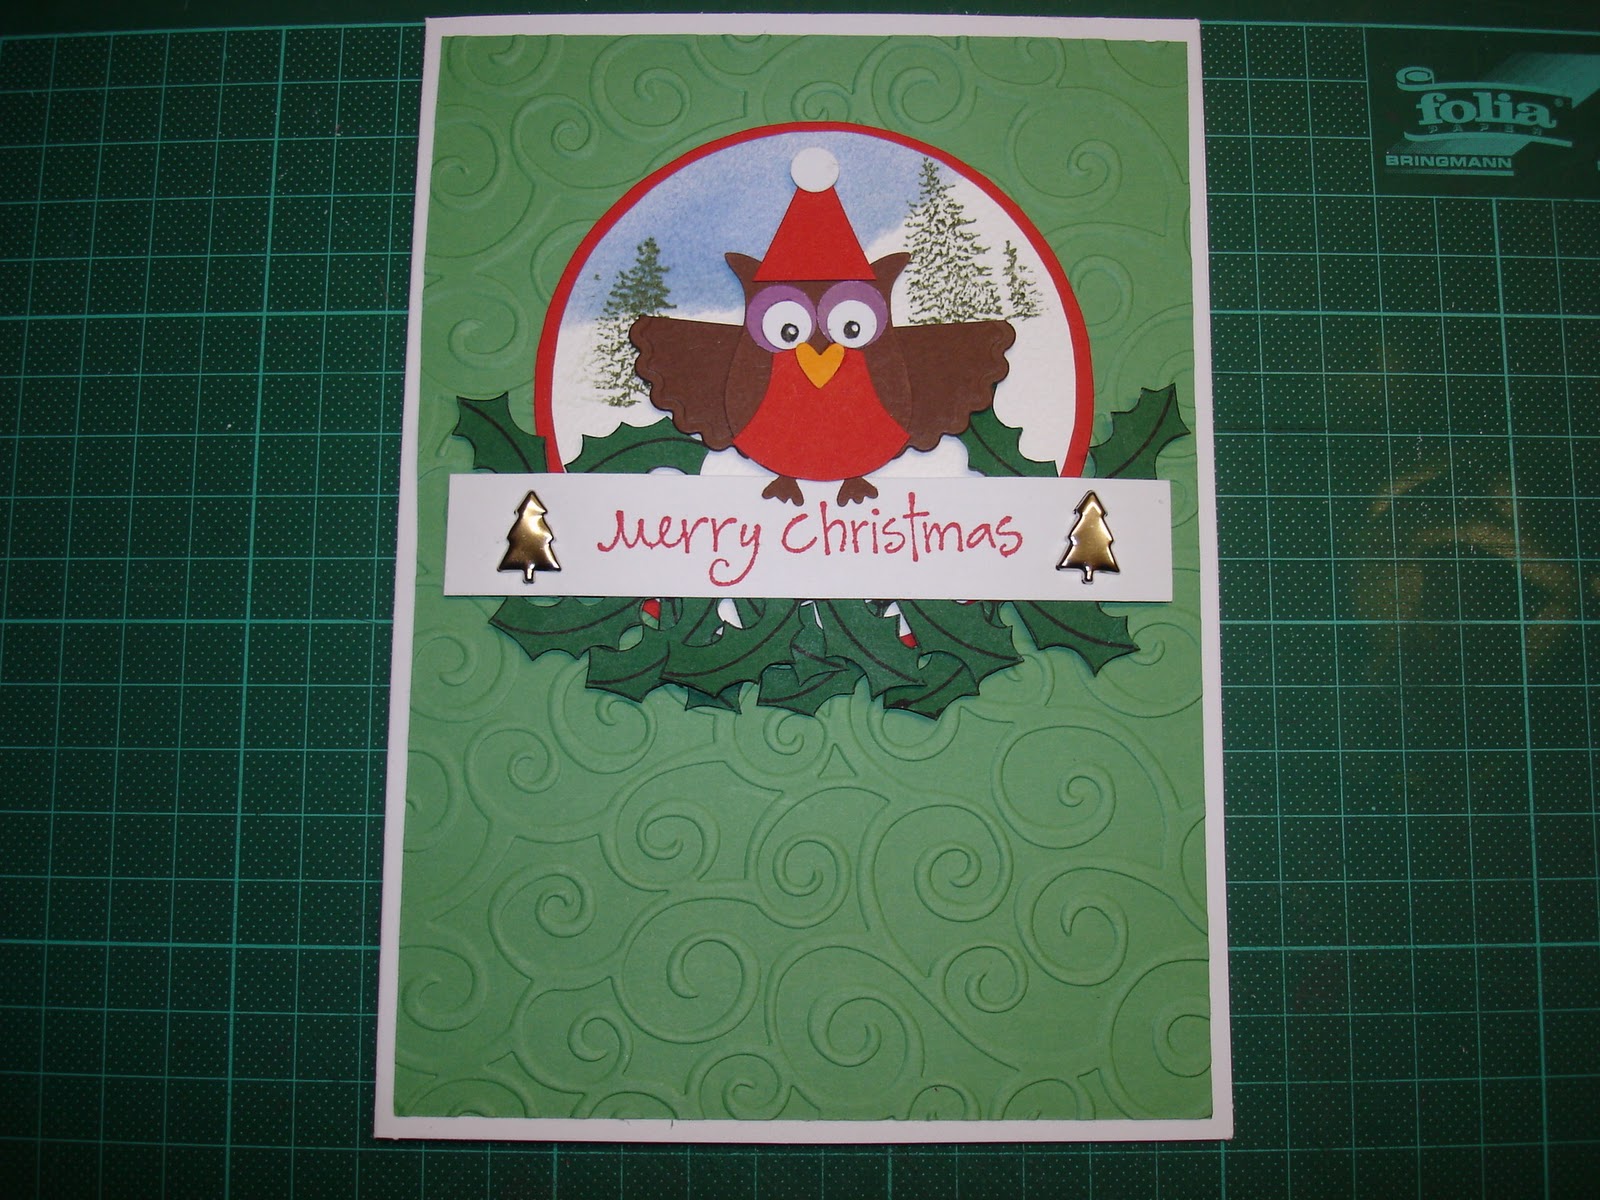
The card started with some green card that was embossed in the BS and placed on a white card. I then sponged a blue sky over a snowy hill scene on a white textured card circle, which was then matted onto a red circle. I then stamped some holly sprigs numerous times on some dark green card and cut them out to sit along the bottom of the scene. I then stamped the greeting on some white card and placed a tree shaped brad at each end. This was then raised on 3D pads for dimension and also somewhere for the owl to perch.
Recipe : Card = Wild Wasabi, Garden Green, Real Red, Chocolate Chip, Lavender Lace, Pumpkin Pie, Whisper White, and white card stock from my stash
Stamps = Dovecrafts and Docraft
Inks = Bashful Blue, Always Artichoke, Real Red, Basic Black, and White Gel pen
Tools = Big Shot, Swirl embossing folder, Owl Punch
Extras = Tree Brads
Thanks for dropping by today, and as tomorrow is my Super Hero day with Nathan, I'll be back in a few days time.

Sunday, 20 November 2011
Butterfly Birthday Wishes


The first is the Mojo Monday #215
where they have this sketch
and the second is Color Throw down #168
where we have this 4 colour palette
Here is my card

First I put some red card through the BS to emboss flowers on it, and then mounted it on a cream card. I then embossed some grey, yellow, and off white cards in different folders, sponged their edges and matted strips on the right hand side of the card .
 Here's a closer veiw of the different embossing textures, although it's not very clear on the red card ( I forgot to use the tan matt!!)
 My BS was working hard for this card as it then cut 3 multi layered yellow flowers and a large off white butterfly. If only the BS could do all these things without me having to crank the handle !!!
The flower parts were layered up, the large stuck flat, and the 2 smaller ones with 3D pads for dimension, and then arranged at the ends of the strips with some grey leaves cut with the 2 step Bird punch. The butterfly's wings were sponged with yellow and red inks and stuck between the flowers by its grey sponged body to leave the wings dimensional. To finish the sentiment was stamped in red on the off white card, 3 red gems added to the flower centers, and 3 yellow gems added in the bottom corner.
Recipe : Card = Real Red ( I don't have Red Riding Hood), So Saffron, Basic Grey, Very Vanilla, and a cream card from my stash
Inks = Real Red, So Saffron, and Sahara Sand ( I don't have grey ink)
Stamps = Verve
Tools = Big Shot, CREA lies Flower Die, Marianne Butterfly die, Sizzix Texture flower plate, Swirl, Budding Vine and Butterfly Kisses embossing folders, and 2 Step Bird Punch
Extras = Red and yellow gems
Well this took quite a while to piece together, what do you think? I hope you like it
For some strange reason Blogger wont allow me to post my Labels list, so when it's behaving again I'll add my lists
That's me for today, and I've got some busy days ahead, but I'll be back as soon as I can.
Thanks for dropping by

Saturday, 19 November 2011
Santa is coming!


The first is using the colours from the
ColourQ challenge #111
and the second is the sketch from the
CAS-ual Fridays challenge CFC #29
and third, I will also be sending it to the St Luke's Charity challenge where the theme is Christmas
This is my card

I started by stamping Santa's sleigh and filled it with the presents on some white card, masked it with a Post It note and stamped the fir tree behind it. The presents were coloured with write markers, and the edges of the card sponged before layering it onto the maroon card.

The sentiment and snowflakes were then carefully inked with a Versamark pen and stamped below it ( positioned with the Stamp-a-ma-jig ) and heat embossed with white powder. It all was then placed on a white card.
Recipe : Card = Whisper White, Rich Razzleberry, and white card stock from my stash
Stamps = Lovely as a Tree, Loads of Love Accessories, Jolly Jingles Roller, and Clarity
Inks = Pear Pizzazz, Pumpkin Pie, Rich Razzleberry, Brown Pro marker ( I dont have Crumb Cake but this was the nearest I have ), and Versamark
Tools = Heat gun and Stamp-a-ma-jig
Extras = White embossing powder
I hope you're all having a good weekend, and thanks for dropping by.

Thursday, 17 November 2011
Joyful Robin
After a couple of busy days, I've finished a card that I started on Tuesday for the Make My Monday challenge . Their theme is to Make a CAS
Christmas Card with emphasis on the Sentiment.
Here it is


Here it is

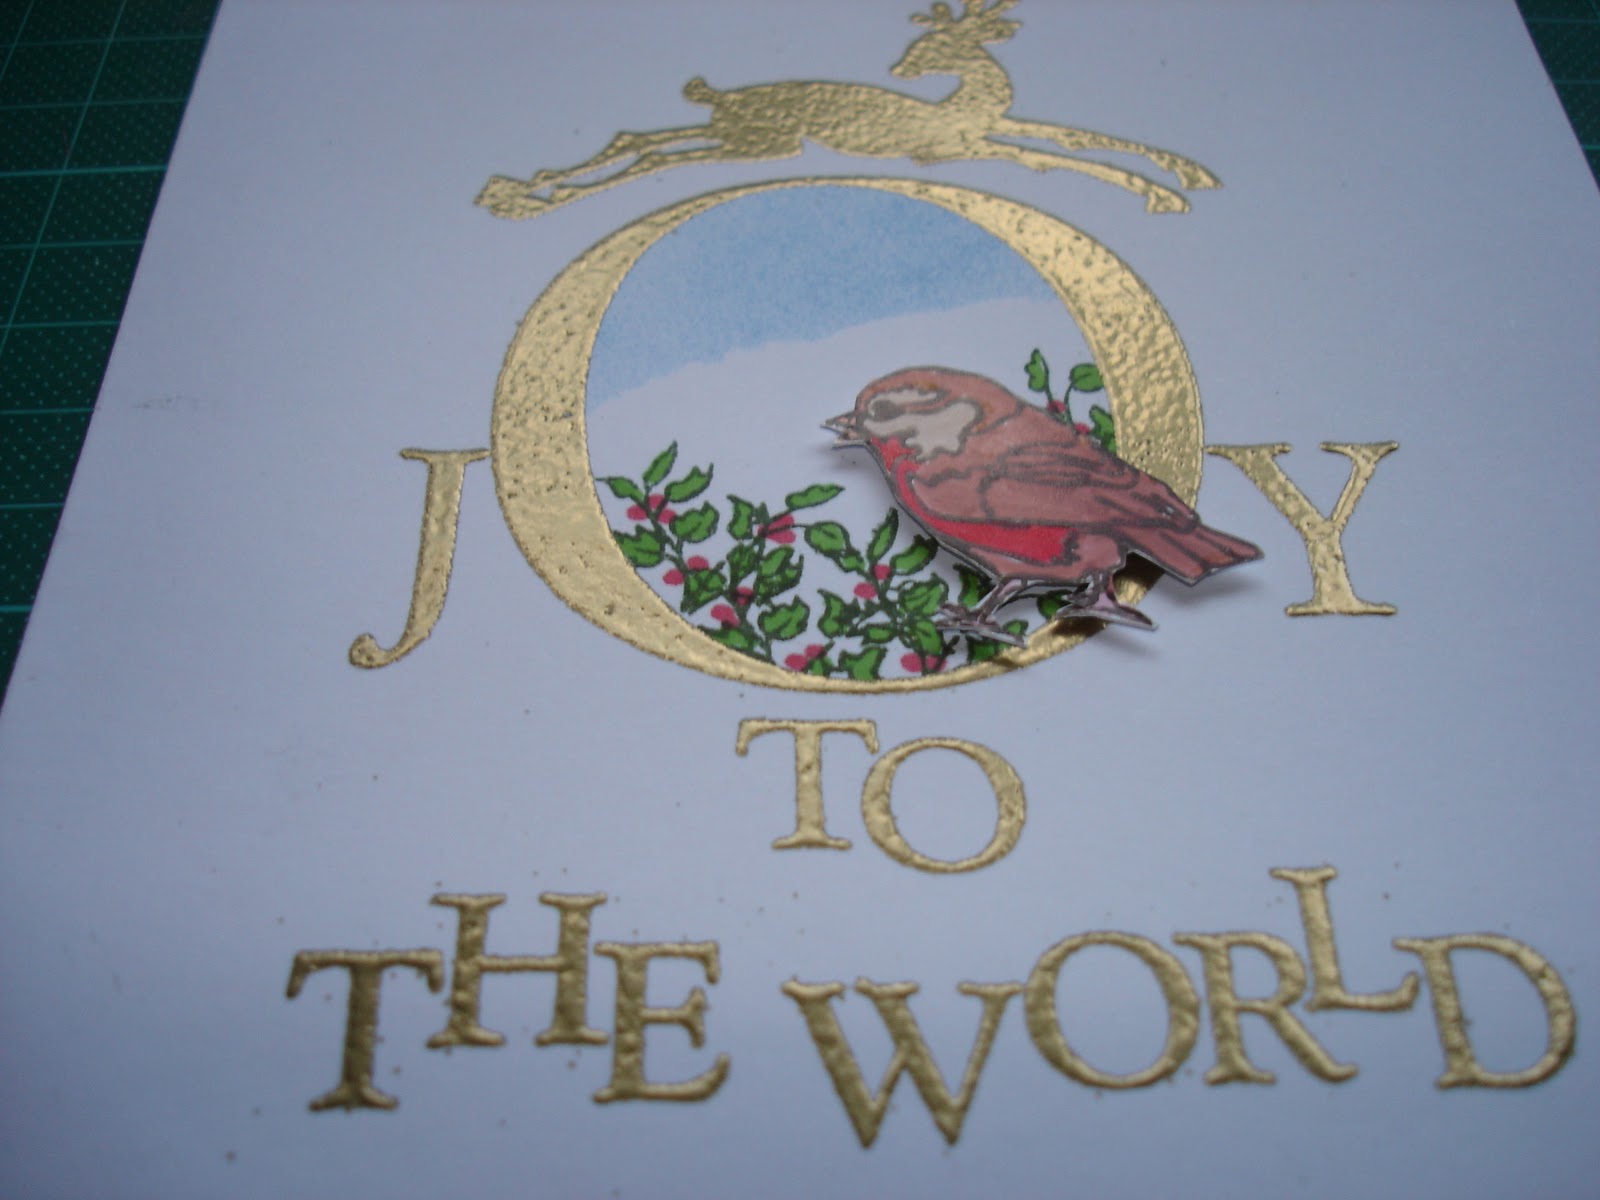
The text and jumping reindeer were Versamark stamped and gold powder heat embossed. In the center of the 'O' I sponged a blue sky over a snowy hill with holly trees in the foreground, and sat on the rim of the letter is a robin ( mounted on 3D pads ) who is looking through the hole.
Here is a closer view of him
Recipe : Card = White card from my stash
Stamps = Clarity and Papermania
Inks = Versamark, SU Pool Party, Poppy Parade, and Green and Brown Pro markers
Tools = Heat gun
Extras = 3D pads
I must say a big "Thank You" to my lovely sister Cassy, who bought the reindeer stamp for me, together with a Santa Sleigh that I promise I'll use soon.
I hope she likes what I've made?
I must confess to Jacqueline that this is my second attempt at the card ( I started the first at her house on Tuesday! ) as I wasn't happy with the first scene, and, I dropped the holly stamp which landed in the wrong place to turn it into a "Happy accident". This card I'm much happier with.
Thanks for dropping by today, and I'd love to know what you think if you have time to leave a comment?
Subscribe to:
Posts (Atom)