Pages

Wednesday 31 August 2011

Whimsical Wings

Yaaaaaaaaayyyyy, I'm Top 3 at Make My Monday again, Thank you DT!!

Hi everyone, Hope you've all had a good Bank Holiday and are enjoying the last few days of the summer with the children before they start the new school term...........can you believe that tomorrow is officially the first day of Autumn??? Scary isn't it??

Also, I must tell you all that the Gremlins are still interfering with my blog, and I cannot leave any comments, so I apologise now and hope that Blogger can sort it out for me soon. Thanks for your understanding, and although I'm silent ( some might hope!!), I'm still looking at all the wonderful projects you are creating.


Anyway, I've not had much chance for crafting myself, but I started a card on Tuesday afternoon at my friends, and have finally managed to finish it so I could enter it in Make My Monday's last challenge on the theme of Things with Wings.

This week we had this photo as inspiration


I started with a white square card, rounded the corners and sponged the edges before layering it with green card with a torn corner, and then a cream card also torn and sponged. I then stamped the foliage and bird from Whimsical Wings using my Stamp-a-ma-jig. The bird cage was stamped and heat embossed on the cream card, and a second cage stamped and embossed on acetate so I could cut out a section to create a cage door so as to suggest that the bird has escaped. The roses were again stamped and placed with the Stamp-a-ma-jig, with 3 being raised on 3D pads for added dimension. The finishing touch was the gem for the birds eye, the cream bow on the cage, and the Verve stamped sentiment.

Here it is. I adore this bird and love to use the whispy feathers stamp for his tail. I hope you like it


and here is a close up of the cage door

Recipe : card = SU Green Galore, Whisper White, and Very Vanilla
Stamps = Whimsical Wings, Baby Blossoms, Papermania, and Verve.
Inks = Regal Rose, Melon Mambo, Certainly Celery, and Versamark
Tools = Heat Gun, and Stamp-a-ma-jig
Extras = Gold embossisng powder, acetate, cream ribbon, and green gem from my stash.

One reason why no crafting has been done, is because we had a family day out to Gloucester Docks on Sunday to see the Tall Ships and the re-enactment of the 1801 war where the Gloucester Regiment fought off the French at Alexandra in Egypt. Here is a photo of one of the ships.                                                                                         
 

 Here Nathan and Nana ( My mum, Mary ) are talking to some of the volunteers dressed as the soldiers would have in those times.


There was a circus style show put on for the kids, but alot of the jokes and one liners were aimed at the adults ( well at least I hope the kids didn't understand what was going on!!!???) . This is the act called 'The Black Eagles', who were acrobats that did a bit of fire eating, juggling, and gyrating of hips that didn't leave alot to the imagination of what lay beneath their loin clothes!!!!                 
I wont bore you with any more photos,  but boring as it sounds, it was a lovely day out.

Now, I'm not making up excuses, but, I'm in hospital on Friday for my next RA treatment, so I may not feel well enough to do any crafting, but I'll be back as soon as I can to show you anything I do manage to create.

Thank you for dropping by, and I'd love to read any comments you have if you get time to leave them.

Back soon


Saturday 27 August 2011

Just Believe it's Mojo Monday

Hi everyone, What a funny old day it is today!!!  One minute it's blue sky and sun, and the next it's grey sky and rain??, it cant make up its mind what it wants to do ( a bit like me with challenges?)

Anyway, this weather gave me an idea as I sat and tried to make a card with an hour to myself in the middle of a chaotic day.

I thought I'd have a go at the Mojo Monday Challenge #205 before the weekend turns into Monday again!! Their sketch looks like this


and my card looks like this, what do you think?


I started with a white card and layered it with some yellow card that had been roughened around the edges with my scissors. I then stamped the flourish from the Bliss set in black on some grey card and put it in my BS with a labels die ( I just had to use it, I'm sorry!). While the beast was out, I cut another label in black, yellow, white, and a yellow butterfly. I then stamped the flowers and grass  from Just Believe on some white card. The grey and black labels ( with added stitches drawn in a white gel pen ) were tucked under the white panel and a grey ribbon was wrapped around it and a knot added. The Just Believe sentiment was stamped in black on the white label and sponged around the edges, and then it was placed on the yellow label which was then stuck with 3D pads to give some dimension. The finishing touch was the butterfly that also had been sponged and yellow gems added along the body.


Recipe : Card = SU Whisper White, Daffodil Delight, Basic Black, and grey from my stash
Stamps = Just Believe and Bliss
Inks = Sahara Sand, Daffodil Delight, and Basic Black
Tools = Big Shot, SB Nestabilities labels and Shapeabilities butterfly
Extras = white gel pen, 3D pads, yellow gems, and grey ribbon from my stash 


I've seen this colour combo used by others crafters, but never felt brave enough to try it myself until now, and I really love the result. I hope you like it too.

We're all off to Gloucester tomorrow to see the Ship regatta, so no crafting for me ( nor the Grand Prix, but thankfully I've got Sky Plus! Phew! ) but I hope to be back in a day or so.

Thanks for dropping by


Friday 26 August 2011

Punched Peacock Side Step

Well that's nearly another week gone, and I've still not had any real time for crafting!!

Hello to my new follower Helen T, how spooky is it that you and my last joinee are both Helens??  Anyway, you both are welcome and Thanks for becoming a follower.

I have had a go at the Simply Stampin challenge though. They call it "Punch it Up", and requires using punches in the design.

After a long think, and ignoring the urge to reach for my Big Shot, I decided to use my Blossom Petals punch to make one of my favourite birds, a peacock.

Here's what he turned out like


I started with a cream card from my stash, scored, cut and folded a strip at the side to make the side step. I mounted some aqua coloured card from my stash onto some Garden Green to create the front and 3 side panels.I then used my blossom punch to cut 5 large petals (for the tail), 1 long petal (for the body), 2 plump petals( for the wings), and 1 small petal ( for the head) from GGreen. 6 long petals were punched out of Taken With Teal, 5 for the tail and 1 to be cut in half for his neck and breast. I then used a borrowed Owl Punch ( Thanks Jacqueline) to punch 5 Whisper White circles ( Owls eyes) and 5 hearts from stash card, and one Crushed Curry Owl was cut up to make the legs, head crown and beak. The white eye came from the Owl punch and I drew his pupil with a black pen. Before sticking together I sponged each petal with Archival Opalite Cypress Frost and Sterling Frost, to try to give the bird the shimmery tinge to the feathers that the real peacocks have. It didn't quite work as I'd hoped, but I've run out of time before the challenge closes, so I hope to try the peacock again soon. The body was stuck with 3D pads to give him more dimension.

Here's a close up of the Opalite on the petals/feathers


The side panels were stamped with a Verve sentiment and a Peacock feather which I had designed and had made for me by TandaStamps. in Handsome Hunter, and coloured with a white gel pen and Bermuda Bay SU marker.

Recipe : Card = SU Garden Green, Taken with Teal, Whisper White
Punch : Blossom petals and 2 step Owl
Inks : Archival Opalites in Sterling Frost and Cypress Frost, Crushed Curry marker, and Handsome Hunter
Stamps : Peacock Feather and Verve sentiment
Extras : 3D pads and White gel pen

Right, I've minutes before the challenge closes so I'm rushing off to get this posted but I'll be back soon.

Thanks for dropping by, and I'd love your comments on my bird if you get a few seconds spare.


Wednesday 24 August 2011

Bee-autiful Garden

Yaaaaaaaaaaaaayyy!!!!!!  I've just seen that I came top 3 again over at Make My Monday so I'm really chuffed...........I feel like it's my birthday not Mum's!!!! Thanks very much to their wonderful DT for picking my card.

Hello and welcome to my new follower, Helen, I hope you like what you see.

I'm typing this with sleep still in my eyes as I've got to get this post done before I go out for the day!! I hope it all makes sense to you.

Well Tuesday at Jacqueline's was a disaster for me, I had an idea for my card for the Make My Monday challenge and it involved making a bee hive, you would have thought that it sounds quite easy, but the pointed angles on folded card completely threw me.

The challenge is still "things with wings" but must include acetate.

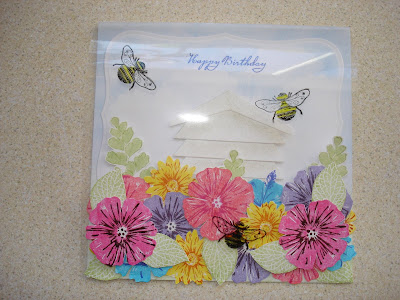
My idea was to make a garden scene on the card and have an acetate front cover on which the bees would be stamped so they looked like they were in flight.

After several expletives and throwing things down on the table, this is the end result.


This is a side view so you can see the dimension that the acetate gives, and I hope you see that the bees look like they are in flight??


This is what the acetate looks like on its own.

The 2 flowers and leaves were added in the bottom corners to help weigh the acetate down.


It all started with a white 6" square card that I sponged the top half with Bashful Blue and the bottom half with Certainly Celery. A SB nestabilitie label was then cut in the BS and the top half again sponged with BBlue, but with a scallop circle mask to make cloud shapes. A verve sentiment was stamped in the sky with Brilliant Blue.  I then stamped the leaf frond from Growing Green in CCelery 3 times and cut them out. Using the Greenhouse Garden set I stamped several flowers in different colours and they were also cut out. A sheet of acetate was stuck on the back of the label and then that was stuck to the card itself (so the sticky tape securing the acetate was hidden) but so that the acetate falls down over the front of the card. The flowers, leaves and hive ( concertinaed card sponged with SSand)  were stuck on the card, and some bees were stamped on the acetate and coloured with Pro markers. Two flowers and some leaves were added at the bottom to stop the acetate rolling up.

Recipe : Card = SU Whisper White and white card from my stash
Stamps = Greenhouse Garden, Growing Green, French Foliage, Verve and Inkadinkado
Inks = SU Regal Rose, Pink Passion, YoYo Yellow, Pumpkin Pie, Tempting Turquoise, Brilliant Blue, Melon Mambo, Rich Razzelberry, Crushed Curry, Dusty Durango, Lovely Lilac, Elegant Eggplant, Sahara Sand, and Black Adirondack
Tools = Big Shot and SB label and scallop circle nestabilities
Extras = Acetate and Pro markers

It's Mum's birthday today, so I'll be spending the day with the family. I'm not sure what we'll be doing but we'll do something?? so no crafting today.

Hope to do some tomorrow, so I'll get back to you then.


Monday 22 August 2011

Snowy Christmas

I've had a real play with ink this afternoon.......yesterday, while looking for my Clarity stamp of the Wise men, I found my other Clarity Christmas stamps that I bought in last years sale, and that I'd forgotten all about. So I stayed with the Christmas theme for my card I'm entering in to the Less is More challenge where they are looking for "Things that Move".

My things that can move are the 2 striking reindeers that sit astride the christmas sentiment, the lone reindeer in the snow blizzard ( does snow move???), and the birds in the moody snowy evening sky. I hope I'm not pushing the boundries too far with this one, and I did desperately try to keep it as less is more, but I got so carried away with my frosty background scene.

This is the end result, I love it and hope that you do too. ( I dont think this will grace anyone elses mantlepiece this year but mine, selfish I know, but I may try other colour combos and background scenes for sending out!).


I started with a white 6" square card and used the BS to cut a label shaped hole in some scrap paper. I sponged through the hole with SU Sahara Sand ink, using torn paper to create a hillside. The trees are from SU Lovely as a Tree set, and were triple stamped to keep them faded. I made a penny size mask on a Post it Note to make a moon in the sky, and sponged over it. In the foreground I stamped a grazing deer ( I think this is from Clarity) and some holly sprigs. The tufts of grass are made by inking only the very edge of a tree and stamping it horizontaly. I stamped some birds in the sky and dotted everywhere with a white gel pen and added some white highlights where the moonlight would fall on things. I used my Stamp-a-ma-jig to place everything exactly where I wanted it.

The large reindeers were stamped on Clarity silk card and coloured with Promarkers, before being cut out and stuck either side of the Dovecraft sentiment that is stamped in black.


Recipe :  Card = white card from stash, and Clarity Silk card
Inks = SU Sahara Sand, Black Adirondack, and Promarkers
Tools = Big Shot and labels nestabilities
Stamps = SU Lovely as a Tree, Clarity, and Dovecraft
Extras = Stamp-a-ma-jig, White Gel pen, penny, and Post it Note.


 I've got to put things away now ready for my Tuesday visit to my friend Jacqueline's. If we manage to actually make anything I'll show you tomorrow

Thanks for looking at my blog today, and hope you can come back soon.


Christmas in August


Hello, that's another week gone, and another week closer to Christmas, so I thought I'd better make a start on my festive cards.


Over at Clean and Simple they have joined up with Jingle belles rock this week and Christmas is also in their minds, and they have given us this sketch as a starting point. I decided to flip it onto its side for my project.


 Cas-ual Fridays challenge is to use any type of embossing, dry embossing, heat embossing or embossing folders


Combining these 2 challenges, I came up with this CAS card


I started with a white card, and used a punch to create a border in gold card, on which I layered some red card that had been through a swirl embossing folder in the BS. I then heat embossed 3 Wise men that had been stamped onto silk card and cut it with a label die before mounting on gold card also cut with a label die. I then stamped the North Star onto silk card and heat embossed it. The Star and Wise men label were stuck with 3D pads to give added dimension. For the sentiment and small stars I've used gold Peel offs as stamping on the embossed card distorted the words.


Recipe : Card = White and gold card from stash, SU Poppy Parade, and Clarity silk card
Stamps = Clarity
Inks = Versamark
Tools = Big Shot, SB Labels nestabilities, Cuttlebug Swirl embossing folder, Martha Stewart punch
Extras = gold embossing powder and gold peel offs from stash.


Sadly I've not had much time for any crafting again this week and I've had a busy weekend as we did a car boot on Saturday. It wasn't as busy as 2 weeks ago when Mum and Ali did their first one, but then the weather was a bit unpredictable with dark black clouds one minute and then blue sky and hot sun the next. I hadn't realised how strong the sun was until that night when I took my wrist splints off and saw that I had tan lines!!! I now look like I've got white fingerless gloves on ( the photo doesn't show it very well, but I'm sure you get the giste)


Well that's it for now, Thanks for stopping by and I'll be back soon.


Thursday 18 August 2011

Mojo #204 and Simply Stampin

Hi everyone, I have two questions for you this afternoon; first, can you believe that it's Thursday already???, and secondly, why do we keep loads of junk ( some say treasure ) in our cupboards?????

When Mum asked if I had anything for this weekends car boot,I didn't think I had much, but then, you open cupboards you haven't been into for ages, and there smiling at you is some hideous ornament you don't remember buying???!!

Anyway, enough of that for now, and onto more important things..........Crafting!!

This afternoon I have combined two challenges, Mojo Monday # 204 with this sketch, and then colour combo from Simply Stampin challenge


I started with some Pretty in Pink card which I triple stamped in Early Espresso with the text, splats, and leaves from French Foliage. I roughed the edges with my scissors and then inked them with EEspresso before matting it onto a Whisper White card.


Now, I've been suffering from BS withdrawal so I just had to get it out for today's project. I used WWhite for a scallop circle and 2 creeping vines, Pacific Point for the corner flourish, two flowers, and a strip that was put in a  Budding Vine embossing folder, EEsspresso for a label, and PiPink for 2 small flowers.

All together the card looks like this


On the PiPink matt, I placed the PPoint corner flourish and strip of embossed card. I then placed the 2 ( lightly sponged ) creeping vines horizontally across the middle of the card before placing the EEsspresso label on top with 3D pads. The scalloped circle had its edges sponged and stamped with a Verve sentiment in EEsspresso, and before it was put away I used it to stamp the butterfly from Strength and Hope, and 2 leaves from French Foliage onto WWhite card. The leaves and flowers were placed on the circle leaving room for the butterfly under the sentiment. The finishing touches were the gems from my stash for the butterfly's body and flower centers.


Phew, it doesn't look like it, or sound like it, but it has taken quite a while to combine everything, so I hope you like it.

I may not get chance to be here blogging tomorrow, so I hope you all have a good weekend and I'll see you soon.


Wednesday 17 August 2011

One Layer Ink card

After a busy day saving the planet again and being a Sheriffs horse, I was glad to get home this evening and sit down.

Yesterday after playing with my brayer, it is still sitting on the table, so thought I'd have a go at the Less is More challenge of a "One layer card with Ink".

First I masked off a panel on a 5" square card of Whisper White with Post It notes. In it I stamped a Dovecraft fairy silhouette in Versamark ink and heat embossed it with clear embossing powder. This would then resist any inks that are put over it. I tried to brayer over the fairy with ink from a Big and Juicy but I got lines from the Post Its, so I re-did it, but this time sponged over the fairy with Orchid Opulence and Regal Rose.

This is the result, its very girlie and pink but I like it.


I like the simplicity of this style of card, and I like it better than my card I did for Make My Monday challenge so I think I will enter this card aswell.

I hope to have more time to craft tomorrow, but Mum and Ali are doing another car boot on Saturday so I've got to help sort out their treasures!!!  If you can please come back and see what I've done.

Thanks for all your lovely comments, I love reading them


Tuesday 16 August 2011

Waiting Fairy sitting on grass

Hi everyone, thanks for dropping in to my blog.

Today I spent my usual hours at Jacqueline's getting hardly anything done, but I did start to make my entry for the Make My Monday challenge where we're still doing things with wings, but this week its Fairies or Angels.

I've got a lovely silhouette stamp of a fairy ( cant remember where from ) sat on some grass and decided to base my card on that. Have a look and see what you think


First I stamped the fairy in black Adirondack in the bottom corner of some Clarity Stamp silk card, and then I drew around a 2p on a Post It note, cut it out, and placed it towards the top left hand corner.

I then used my Speedball brayer and a Big and Juicy ink pad (Vibrant Primary) to roll colour in the corner down towards the moon till the Post It was covered, and it was peeled off. I then brayered some  Pesto Adirondack in the Fairy's corner.

Next I used Adirondack black to stamp flower silhouettes along the bottom of the card. I stamped an old tree in the top corner as if it was a protruding branch ( the tree was a sketch that I had made into a clear rubber stamp by a company I found in a magazine, Tandastamps ), and added some leaves from a Clarity set.

I must admit that most of the black ink ended up on my fingers, and when I touched the card it was transferred to places where I didn't want ink, so I had to keep stamping leaves to cover smudges.

The stamped picture was then mounted onto some really dark navy card and placed on a cream card from my stash, and finished with a black Verve sentiment.


WOW!!!!! I've just realised that I've not used my beloved BS or Stampin' Up products, what's going on???

I'm doing my Super Hero stuff tomorrow with Nathan, so hope to be back in a few days.

If you have the time to, I'd love to read your comments on my card.


Monday 15 August 2011

Enjoy Your Day with French Foliage

I'm typing this post with crossed fingers, hoping that the Gremlins will allow my card to be displayed.

I have missed several challenges lately, what with a busy schedule and the gremlins in my blog, so I was glad to be able to sit still this afternoon and create.I saw that this week Clean and Simple and Cas-ual Fridays are teaming up together with a sketch, so decided to have a go at it.


I started my entry with a 5" square cream card from my stash and masked a 5 1/2cm panel on the left hand side. I sponged this with SU So Saffron, and stamped the text from French Foliage in Apricot Appeal. The leaves from the same set were then randomly stamped in Certainly Celery, Always Artichoke, and Soft Suede after stamping twice on a scrap piece of paper first to keep the images faded. A band of Adirondack Butterscotch was sponged across the panel just below half way up the masked area to lift the colours. I then stamped the dried grass from the Garden Silhouettes set in Adirondack Rust, and double stamped it again for a faded sprig.


 This was all finished off with a Verve sentiment which was the Blog Candy I was lucky enough to win with Mojo Monday in July.


Lately, I have tried so hard to keep away from bright in your face colours,and I've found that I quite like the softer colour pallets, and I was very happy with the result of this card and I hope you like it too.


With any luck I can do some more challenges and get them posted during the rest of the week ( if all goes according to plan!!)


Thanks for stopping by, and hope to see you again soon.


Saturday 13 August 2011

French Foliage Secret Garden

I've got my fingers crossed that this post gets published on my original blog, but here goes.....

Over at Make My Monday Challenge it's still "things with wings", and this week that means 'birds or bugs'.

As I've just received my new SU French Foliage set, I decided to use it for this challenge.

Here's the card and then I'll tell you how it was made.


I started with a white 6" square card from my stash and sponged the center with Bashful Blue and Certainly Celery. Onto the lower sponged green area, I stamped the grassy image from Just Believe in Sahara Sand, and 2 fern images (from a stamp set I cannot recall the name of), in Always Artichoke, CCelery, and Adirondack Pesto.

I then stamped the text in BBlue over the upper sponged blue area, and randomly stamped the splats
stamp in SSand over the entire background.

Next, I stamped the leaves in a random square in CCelery, Handsome Hunter, and Adirondack Pesto, Rust, and Butterscotch, and cut out the inner section to create a foliage frame. This was then mounted on some Garden Green card and stuck onto the background with 3D pads to give some dimension and the impression that you are looking through a hedge into a secret garden.

Using SSand I stamped the Summer Dovecote and 4 birds from Flower Soft stamp set onto some Very Vanilla card, and soften the lines with an aqua painter before cutting them out. The pair of doves and the single dove were stuck onto the Dovecote itself, and the 2 doves in flight were placed in the sky on 3D pads to give them more dimension.

I hope that the photo shows what I am trying to describe!?

Anyway, my eyes are struggling now as I've been staring at my laptop for far too long and they are feeling really sore.

Hopefully I will be back soon with another post.

Thanks for sticking with me.


GREMLINS !! ?? !!

Hi friends

I cannot explain what has been going on with my Blog over the last 10 days or so, but some how it was corrupted and I couldn't leave anybody comments, or create posts etc.

For the last 2 days Jacqueline, her husband Clive, and her son Will, have all tried to solve the issue without much success, so this afternoon Will set up another blog for me in Google Chrome.

I've just got home, and I cant explain it but it looks like I CAN now leave a post here on my original blog??????

I'm sorry for any inconveniences caused, and please be patient with me as I will try to get back to normal asap!!!!

 Who said technology was a good thing???

Bev.x

Tuesday 9 August 2011

Happy Birthday Owl

Hello, thanks for dropping by, I hope you like what you see.

Today at our Craft Club workshop we made a cute Owl Pop Up card, and surprisingly I managed to finish the card, all but the greetings which I've added this evening.

Isn't it cute!!


I started with a white square card from my stash and added a matt of SU Green Galore. The Owl was made with Jacqueline's SU Owl Punch in Chocolate Chip, with his wings made from a scallop circle cut in half ( Using a BS and nestabilities ), and his feathery chest was the stamped flourish from the SU Bliss set in CChip on Very Vanilla. The bunting, hat, and googly eyes were supplied by Jacqueline, and I added the occasional heart on the bunting flags. The Woodware sentiment was stamped in CChip and the bunting line drawn in a Letraset fine black pen.


The inside was lined with some more GGalore that had had 3 slits cut into the fold that were then folded in the other way to create somewhere for the owls to be stuck to. ( It's difficult to explain so I hope the photo speaks for itself?)

 I decorated the middle owl with eyelids and lashes, a pink tummy, and placed a tiara on her head.  ( This was made with a MS punch.)                                                                 Well we cant let the men have all the fun can we????                                                                                  The bunting was continued inside the card and again the sentiment was added in CChip                  
                                                                                 I hope you like the owls as much as I do-oo-oo-oo!!                                                                                                                                                       I'm sorry, I just couldn't stop myself!
 On that note I'd better sign off.


Tomorrow I'm spending the day at my sister's, so no doubt there will be some more emergencies and baddies for us Super Hero's ( Nathan and I ) to sort out, but if I'm not too tired from saving the world I may have time to make something else on Thursday.


See you again soon I hope.


Monday 8 August 2011

Just Believe

Yaaaaaaaaayyy!!!! I've made the Top 3 at Make My Monday Challenge with my butterfly card.                                       
I'm really chuffed, and although I make the cards for my own pleasure, it's always special when other people like your work as much as you do, so a big thanks to their DT .                                        


After another busy day of being a Super Hero with my nephew Nathan, saving the world from 'the Baddies', I have sat down exhausted to create a card for the Simply Stampin Challenge #19 where they have this sketch as its base.

My latest favorite stamp set, Just Believe, came out for this one.

I started with a 5" square white card from my stash, and layered it with a matt of Wild Wasabi. Then I stamped the flower and grass image onto a square of Whisper White in Certainly Celery and Melon Mambo and added a Clarity verse also in MMambo.
This was layered onto some Cherry Cobbler card and finished with a strip of the same card that had been shaped with a MS punch.


Take a look at the end result and see what you think.


The flowers and grass under the verse are half of the original stamp, with the stamping made easier by colouring the required parts of the stamp with SU markers, and positioned with the stamp-a-ma-jig.


Tomorrow is our craft club morning at Jacqueline's, so I hope to have a finished article to show you, but with coffee and chatting you never know!!

Thanks for dropping by and I hope you have time to call again soon.


Sunday 7 August 2011

Summer by the sea Anniversary

Hello again!

I've had time today to do another quick card, this time for the Clean and Simple challenge  (FTL 152) with this sketch as the base.


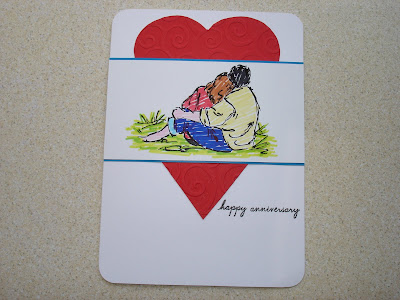
So, I started with some Clarity silk card stock and stamped the loving couple from SU Summer by the Sea in black Adirondack ink. I coloured them in roughly with Pro markers and layered them onto some Pacific Point card. I then drew a heart free hand on some Real Red card and put it through the BS in a Cuttlebug swirl embossing folder. I cut the heart in half and stuck the couple across the middle of it before layering it all on a white card from my stash that has had the corners rounded. It was finished off with a Basic Black Woodware sentiment stamped at the bottom of the heart.

What do you think?


Recipe : Card = SU Real Red, Pacific Point, Clarity Silk card, and white card stock from my stash
Ink =  Black Adirondack and SU Basic Black
Stamps = SU Summer by the Sea and Woodware sentiment
Tools = Big Shot, Cuttlebug embossing folder, and Pro markers


That's it for today, thanks for dropping by and I hope you can come again soon.