Pages

Showing posts with label Merry Christmas. Show all posts

Thursday, 8 December 2011

Glitter Christmas

Hello my blogging friends, I'm back in the crafting saddle but I'm not firing on all cylinders yet, so please bear with me.

Today I went to Jacqueline's, and as her challenge blog ( Make My Monday) is looking for a Seasonal project with Added Glitter, I decided to have a go at a technique I'd seen on TV done by Barbara Gray from Clarity Stamps. She uses some sticky paper ( designed and sold by her company )to create glittery scenes that then get stuck on acetate.

Here is the finished card, and then I'll try to explain how I made it!!


If I'd thought about it properly, I would have taken photos of the various stages, but I didn't think of it till the picture was complete!!!! 

Anyway, I placed 2 strips of 1.5" double sided tape side by side, sticky side face up, and stamped the reindeer silhouette directly onto the sticky side with Black Archival ink.                                 The tape was then placed onto the rougher side of a piece of acetate. With a craft knife I carefully cut into the tape backing paper to make a thin wavy strip under the deer, and peeled off the yellow backing ( too much pressure on the knife and it will cut the acetate as well, so carefully does it)


I then sprinkled blue glitter onto the exposed sticky tape. Either side of the deer I cut 2 Christmas trees, but the first parts of the backing to be peeled off were the stripes of tinsel and baubles ( glittered with red ), then the larger trees ( pale green glitter) and lastly the smaller trees ( darker green). I then cut a wavy strip across the background and sprinkled it with silver glitter, and finally the remaining yellow backing paper was peeled off and sprinkled with white glitter.  

Now, to stick this glittery scene down, I stuck 2 strips of the tape onto white card and peeled off the backing tape. The glittery side of the acetate was stuck onto the tape to leave the shiny side of the acetate face up ( so the glitter is sandwiched between acetate and white card) and the scene was then trimmed and layered on some red and green cards. The sentiment was stamped in Versamark and heat embossed with white powder on the red card, and finished off with 3 white pearls.

I hope that this all makes sense to you, but I can thoroughly recommend this technique if you fancy getting glitter absolutely everywhere!!! I think poor Jacqueline will be finding it for weeks to come ( especially as Louise seemed to like lying on it!! ) , Sorry Jacqueline.  

Recipe :    
Card = Green Galore, Real Red, and Whisper White
Stamps = Clarity and Dovecraft
Inks = Black Archival and Versamark
Tools = Martha Stewart border punch, Heat gun, craft knife and wide double sided tape  
Extras = Blue, red, pale green, dark green, silver and white glitters, White embossing powder, and White flat backed pearls


Thanks for dropping by today, and I hope my rambling instructions haven't scrambled your minds too much.


Monday, 28 November 2011

Bling Baubles

Here we are at the start of another week, and another week closer to Christmas! Where is the time going??

Today's card is for the Less is More Challenge where the subject is


This is my card


First I inked up the flourish with Versamark and then I masked off the edges to make a round shape, before stamping onto a white card.


I  then heat embossed the shape with gold powder ( sorry but my photo is not the best to show the gold), and repeated the process twice more ( placing the stamp by using the Stamp-a-ma-jig ). The sentiment was stamped in red across the top, and gold wiggly lines drawn to hang the baubles, and the finishing touches were the "bling gems".

I was pleased with my efforts until I drew the lines to hang the baubles, and then I realised that the right hand one is a little too close to the top one, but I couldn't do anything to disguise it, so just went with it.


Recipe: Card = from my stash
Stamps = Bliss and Dovecraft
Inks = Versamark and Real Red
Tools = Heat Gun and Stamp-a-ma-jig
Extras = Gold embossing powder, Gold Pilot marker, and gems

Thanks for dropping by, and please call again if you can.


Thursday, 24 November 2011

Holly and the Ivy

What a busy week I've had so far, and sadly with no time for crafting.

This card I started on Tuesday, and have only just managed to put it together tonight. My RA has flared up and the pain is keeping me awake, so to try to take my mind off it I've tried to do something useful.

It is for the Make My Monday challenge where the theme is Christmas with Flowers, Foliage, or snowflakes, and I'll also be entering it to the Pals Paper Arts challenge #121 who are looking for Elements of Style - Pearls.


For MMM, I chose the Flowers and Foliage option, as you can see its "The Holly and the Ivy" wreath with Poinsettias studded with pearls.


I stamped numerous holly sprigs onto green card and cut them out ( which took hours!! ) and stuck them down in a circle on a square white card. Years ago from Readicuts, I bought some printed flowers sheets that came with a set of matching punches, and I've used the Ivy punch and leaves for this project, touched with some Twinkles.


I then coloured some paper flowers with a red Pro marker and layered 2 together before adding them to the wreath on 3D pads. The finishing touches were the stamped sentiment, red bow, and white pearls in the flower centers.


Recipe : Card = Garden Green and white card stock from my stash
Stamps = Docrafts and Dovecrafts
Inks = Always Artichoke and Real Red
Tools = Ivy leaf punch
Extras = Red Ribbon, Pearls, and Cosmic Twinkles


I wish all my US readers a "Happy Thanksgiving", and my UK readers a "Happy weekend!"

Any minute now I will be turned into a pumpkin so I'd better get this post done PDQ!

On Saturday I'm off to see the 3D Arthur Christmas film at the cinema with my family........Nathan says I have to sit next to him incase I'm scared!! Bless Him. I'll let you know how I get on!

Thanks for dropping by, and hope you'll stop by again soon


Tuesday, 22 November 2011

A Christmas Hoot!

Yaaaayy!! I've come Top 3 at the  Simply Stampin Challenge again. I'm so pleased and must say a big "Thank You" to the DT for choosing me.

The card I've made today is for the Clean and Simple challenge #167 where they have this sketch.

I thought for a change I'd put my stamps aside and use the cute owl I made with Jacqueline's punch a while ago.


Here he is in his Santa suit, isn't he cute?


The card started with some green card that was embossed in the BS and placed on a white card. I then sponged a blue sky over a snowy hill scene on a white textured card circle, which was then matted onto a red circle. I then stamped some holly sprigs numerous times on some dark green card and cut them out to sit along the bottom of the scene. I then stamped the greeting on some white card and placed a tree shaped brad at each end. This was then raised on 3D pads for dimension and also somewhere for the owl to perch.

Recipe : Card = Wild Wasabi, Garden Green, Real Red, Chocolate Chip, Lavender Lace, Pumpkin Pie, Whisper White, and white card stock from my stash
Stamps = Dovecrafts and Docraft
Inks = Bashful Blue, Always Artichoke, Real Red, Basic Black, and White Gel pen
Tools = Big Shot, Swirl embossing folder, Owl Punch
Extras = Tree Brads


Thanks for dropping by today, and as tomorrow is my Super Hero day with Nathan,  I'll be back in a few days time.


Saturday, 12 November 2011

Christmas is coming!!


While watching my guilty pleasure ( the Grand Prix) this afternoon I have been able to do some crafting. Yaaaaay!!

And as I promised there is no sign of my Baroque Motifs on my card today!!


I have made it for the Clean and Simple challenge where they have this sketch,

and I'll also be entering it in the CAS-ual Fridays challenge  where they want a tag or something with a tag on it.

In case you haven't noticed yet, Christmas is coming fast and so that was my inspiration for my card.

This is it


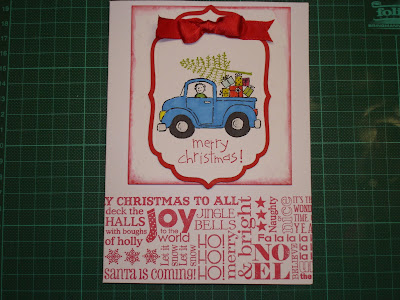
I first stamped the Christmas sentiments in red across the bottom of a white card, and put some more white card through the BS on a dotty daisy texture plate (looks like snowflakes ) and sponged the edges in red. This was placed on 3D pads to add dimension. A red and White tag were then cut in the BS and the white matted on top. On this I stamped the pick up with its load of presents and tree (using the Stamp-a-ma-jig) which were coloured with SU Write markers and Pro markers. The finishing touch was the ribbon bow to attach the tag.
I've just seen the cola advert ( the famous one in the red cans) on TV which definitely means that the " holidays are coming!!", so very soon the decorations will need bringing down from the loft and the house being transformed into Santa's grotto.

I've had a terrible morning sitting in a cold Kwik Fit garage..........I drove to my mum's yesterday and noticed that one of my front tyres pressure was very low, and when I came to drive home, it was completely flat (only at the bottom though!!??). There was no way anything could be done till today, so I was up early waiting for the RAC to come and do a temporary repair so I could drive to Worcester ( 15 miles away) for a new tyre. Thanks to all the car thieves these days, Vauxhall cars no longer have spare wheels under the car, or in the boot ( means more space for cargo, apparently?) so it left me high and dry. Thank goodness I was at mum's.

Anyway, it's all sorted now, just no more off road rallying for me!!.

Hopefully, I can do some crafting this week, so please call back again if you can.

Thanks to everyone who leaves me comments, I love to read each one to see what you think.


Vintage Christmas

Yesterday I started another card for the Make My Monday challenge as I wasn't that happy with my first entry. This time I've tried the vintage style ( way out of my comfort zone, but the more you do I suppose the better you feel about it?)

I'll also be sending it to St Lukes charity where their theme this month is Christmas.


I've used 3 papers that I'd downloaded years ago from I cant remember where.......a holly print, Hark the Herald Angels music sheet, and vintage christmas angels ( I hope they forgive me for cutting their wings off?! ) .The holly was placed on a cream card base and the edges sponged. A square was torn from the music sheet and red sponged on the edges, and then some fluffy threads were wrapped around it before it was layered on the holly. The 2 children were cut out and stuck down and then the whole thing was sponged with a distress ink. The sentiment banner was added on 3D pads with a bow of the threads dangeling behind it with jingle bells on the ends.

Recipe: Card = from my stash
Inks =  Real Red, Certainly Celery, and Tim Holtz Tea Dye
Stamps = Dovecraft
Extras = Fluffy threads and jingle bells

It's a Grand Prix weekend so I hope I'll get some crafting done.

Thanks for dropping by, and I'd love it if you could call again if you have time.


Thursday, 10 November 2011

Workshop Christmas cards

Would you believe it, I've had another busy day so have not had time to craft, so instead here are the other two cards we made at our Tuesday workshop run by Jacqueline. Click here to visit her fabulous blog to see the details of these cards and her many other stunning creations.


The tree is dimensional and is able to lie flat to fit into an envelope.

Here it is from a different angle.


The other card is this one. Unfortunately, I messed up the stamping of the white tree so it looks thicker than the purple one, oh well.


Hopefully, I can do something tomorrow, so please call again if you can.


Wednesday, 9 November 2011

Baroque Christmas

I've not had much time for crafting again lately, but yesterday it was our craft club day, and for once I managed to make, not just one card, but three.....I know, amazing!!( mind you, it's all down to Jacqueline who did all the hard work and prepared all the elements for us)

I'll show you those later, but first here is a card that I'll be entering into the CAS-ualfridays challenge #27 where the design or embellishments go over the edge of the base card.

As I've used traditional Christmas colours of red, green, and gold I'll also be entering it to the Make My Monday challenge #23, where Christmas is their months theme, and this week it's Traditional or Vintage.

So here it is


I started by drawing around a bauble card of my friend Louise, on some red card and cut it out. The flourish was Versamark stamped on it and heat embossed with gold powder and then gems randomly added. The same flourish was then stamped in green on a 5" square white card that had opposing corners rounded, before the bauble was placed slightly overhanging the edge, as if tied to the green branch behind it. The finishing touches were the gold bow and stamped red sentiment. 


Recipe:  Card = Real Red and Whisper White
Stamps = Baroque Motifs and sentiment ( Jacqueline's)
Inks = Versamark and Real Red
Tools = Heat gun and Xcut corner rounder
Extras = Gold embossing powder, ribbon, and gems


Here's one of the festive cards we made at our workshop. I love that it's so pretty yet so simple to make, and again in the traditional red and green colours.

I'll show you the others in my next post ( if you'd like to pop back?)

Thanks for looking at my blog today, and I'll be back soon with some more projects.


Thursday, 29 September 2011

Rockin' Robin

Phew, it's been scorchio here today, and it's supposed to get even hotter tomorrow, so I will be doing everything possible to keep in the shade.


I've had another busy day, but managed to find some time to make a card. I saw over at Kraft Journal challenge  they were asking for us to "Use a Sketch" as inspiration or CASE it.                                         Some time ago I saw this sketch at Clean and Simple challenge and loved it's simplicity, so have decided to use it.

I'm still doing the Christmas list for my friend ( and I think this is the last one?) so this is what I came up with.


 I started with a cream card and masked off an area a third of the way down with Post Its. I sponged this area with green, and then randomly stamped a pine sprig, a leaf, and holly leaves in various green inks, before drawing a wiggely gold line along the outline.  I then used the BS to cut 3 labels in cream and stuck them on the green stamped panel ( sadly the photo doesn't really show how the green makes the cream labels stand out ). I made 3 Robins with the Bird punch and stuck one on each of the labels. The finishing touch was the green stamped sentiment above the border which was put in place with my Stamp-a-ma-jig.


Recipe : Card = SU So Saffron, Chocolate Chip, Poppy Parade, and cream card from my stash
Inks = Certainly Celery, Always Artichoke, and Handsome Hunter
Stamps = Dovecraft
Tools = Big Shot and Labels Nestabilities
Extras = Gold Pilot marker

Have you noticed the middle Robin is facing the wrong way? When sticking them together I hadn't noticed he was the other way around till I came to put them on the card, but I think I like it that he is different. What do you think?

  
Today, Mum has been here helping me to clean my carpet in my lounge and dining room with a Vax machine. Our logic was that the humid weather would help to dry them afterwards, but we didn't invisage just how hot we would get doing it. Neither of us are in the best of health and both are crippled with RA, so the moaning and groaning we did would have made a hole in the Ozone layer! Still it got done, and I was glad to sit and rest this evening and do some crafting.

This weekend we will be doing various things for Nathan's 4th birthday, so I wont get chance to do anything else till next week.

I hope you all have a good weekend and can make the most of the returning summer before it disappears again.

Thanks for dropping by today.


Monday, 22 August 2011

Snowy Christmas

I've had a real play with ink this afternoon.......yesterday, while looking for my Clarity stamp of the Wise men, I found my other Clarity Christmas stamps that I bought in last years sale, and that I'd forgotten all about. So I stayed with the Christmas theme for my card I'm entering in to the Less is More challenge where they are looking for "Things that Move".

My things that can move are the 2 striking reindeers that sit astride the christmas sentiment, the lone reindeer in the snow blizzard ( does snow move???), and the birds in the moody snowy evening sky. I hope I'm not pushing the boundries too far with this one, and I did desperately try to keep it as less is more, but I got so carried away with my frosty background scene.

This is the end result, I love it and hope that you do too. ( I dont think this will grace anyone elses mantlepiece this year but mine, selfish I know, but I may try other colour combos and background scenes for sending out!).


I started with a white 6" square card and used the BS to cut a label shaped hole in some scrap paper. I sponged through the hole with SU Sahara Sand ink, using torn paper to create a hillside. The trees are from SU Lovely as a Tree set, and were triple stamped to keep them faded. I made a penny size mask on a Post it Note to make a moon in the sky, and sponged over it. In the foreground I stamped a grazing deer ( I think this is from Clarity) and some holly sprigs. The tufts of grass are made by inking only the very edge of a tree and stamping it horizontaly. I stamped some birds in the sky and dotted everywhere with a white gel pen and added some white highlights where the moonlight would fall on things. I used my Stamp-a-ma-jig to place everything exactly where I wanted it.

The large reindeers were stamped on Clarity silk card and coloured with Promarkers, before being cut out and stuck either side of the Dovecraft sentiment that is stamped in black.


Recipe :  Card = white card from stash, and Clarity Silk card
Inks = SU Sahara Sand, Black Adirondack, and Promarkers
Tools = Big Shot and labels nestabilities
Stamps = SU Lovely as a Tree, Clarity, and Dovecraft
Extras = Stamp-a-ma-jig, White Gel pen, penny, and Post it Note.


 I've got to put things away now ready for my Tuesday visit to my friend Jacqueline's. If we manage to actually make anything I'll show you tomorrow

Thanks for looking at my blog today, and hope you can come back soon.